Serrations and Sharpening on Modern Handmade Knife Blades

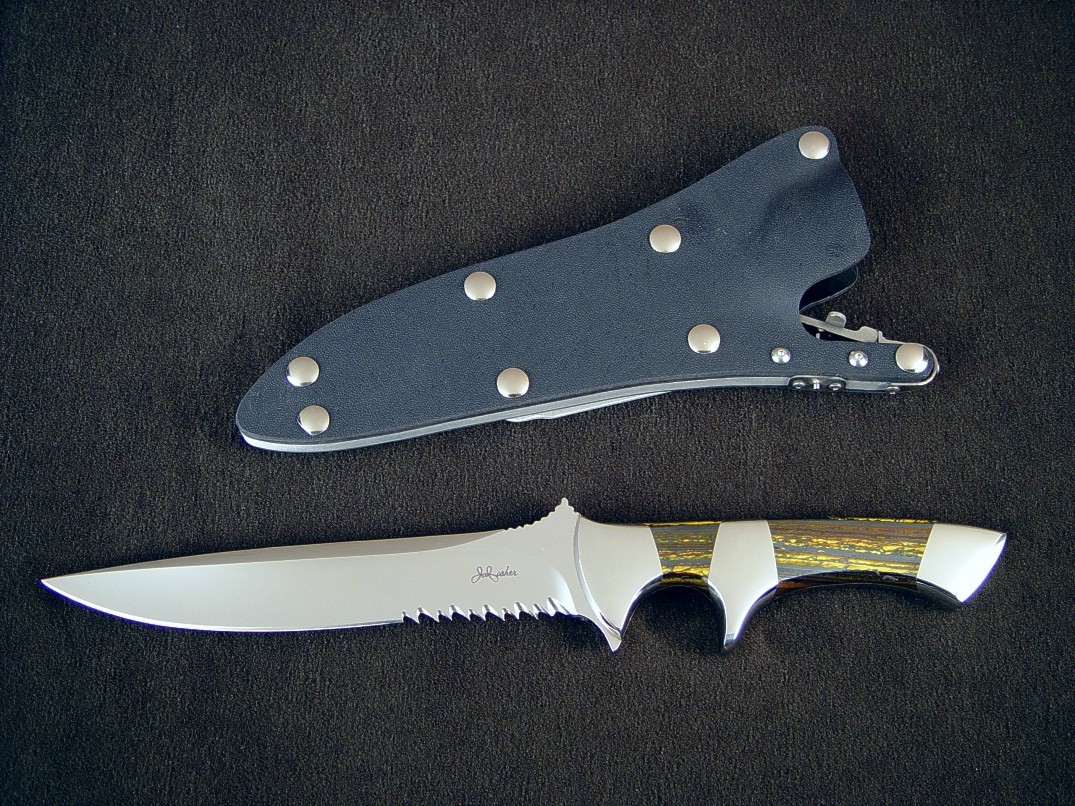
"Vampire" Serrations on this
Arctica
This page is about serrations, particularly on the
modern handmade and custom knife, specifically on my knives created here
in Sharp Instinct Studio in my sole authorship knives.
I'll detail a little history and description of serrations and why they
work and how they apply, with descriptions and photographs of my own
serration styles and applications. I will explain why I've chosen a
particular type of serration for a specific application, and how they
work in that application. I'll describe the limitations of their use, considerations
for individual knife blades, and how to sharpen the serrations on my knives specifically.
I'll detail current and accessible sharpening tools and their features
so the owner of one of my serrated knives can sharpen his own serrated
edge sections. I do this as part of my commitment to my tradecraft, art,
and professional service to my knife clients. As with most other pages
of this site, when you are done reading this, I promise you will know
more than most people, knife makers, and knife manufacturers about
serrations on modern hand knife blades.
For detailed descriptions and discussion of other knife maker's or factory knife
serrations, please contact those other suppliers and makers.
Page Topics

Canine serrations on the top edge of this
Triton

"
Sasserides" Bread Knife with Mini-curtain serrations
The word serration comes from the noun and adjective
serrate. Serrate is probably a imitative variation of the Latin
word serra, which means saw. The word sierra is a
variation of the Latin word, so it's no wonder saw-toothed mountains are
named sierras. The study of serrations is a fascinating
subject, and naturalists have wondered for centuries how animal and
insect teeth, as well as some plant leaf edges cut so well. Seen in modern
photomicrographs, it is usually tiny serrations that are the
contributing factor to the keen cutting ability of sharks teeth, saw
grass, and even corn leaves and dinosaur teeth. Nature's serrations
work, so we simply imitate the natural world with our own version on the cutting edges of
knives.
Many modern knives have serrated blades. The reason for serrations is
to aid in cutting, ripping, and tearing
through tough materials that resist cutting with a regular smooth blade edge. In theory, if a regular, straight
cutting edge of a knife blade is truly sharp, serrations should never be necessary. The reality is, though, many
abrasion-resistant surfaces like plastics, hardwoods, textiles, and other tough modern materials are better cut
with the ripping action of serrations.
The reason serrations work is because of the tremendous pressure applied to very small cutting edges or advancing
teeth surfaces. I'll probably delve into this in greater detail in my book, but the concept is that through a combination
of light percussion and advancing narrow cross-sections, a tooth can have a more aggressive cut than a smooth blade. Of
course, a regular straight cutting edge should be clean, efficient, and smooth, and the two types together make for a very
useful knife that can cut through a wide variety of materials, as
long as the knife maker has done his job right.
When I first started making knives for military combat applications,
my military clients insisted on serrations that work. They
were, frankly, tired of owning and trying to use knives that had serrations that were not sharp, keen, or aggressive
enough. When I
informed them that in order for serrations to work well, they must be thin, and therefore
had a greater potential to break, their
request was simple: "make a serration that works aggressively, and even if I break off a tooth, the serration keeps on
working, cutting, ripping, and tearing." This is what my serrations
do.
Page Topics

Very aggressive hammerhead serrations on
this PJLT
There are two camps on serrations. Some like them, some do not.
Both are correct.
Whether a knife has or (in the case of custom knives)
will have serrations on the blade bears careful
consideration. On my Blades page, I discuss this briefly,
and here is a more detailed version. I'll give the
limitations first, and then the advantages:
Serrations: Limitations and Considerations
- Serrations subtract from the overall regular straight cutting edge length of the knife.
If your knife has a 6" blade,
this is measured (in most states) from the tip of the point to the
front face of the bolster or guard face, and not the actual cutting edge length.
So the cutting edge may be 5.5"
long, and you decide on 2" of serrations. You are now left
with a 3.5" regular edged knife blade. On shorter blades, this
is very noticeable, and can even prohibit the use of serrations
altogether. A knife that has a regular cutting edge length of one
inch is hardly worth a handle, unless you want a box cutter. Please
consider that a fixed blade box cutter with replaceable double ended
utility blades has a cutting edge length of over 1.25" and the more
common retractable version has a cutting edge length of 1.125"!
- Serrations can make a knife harder to insert and tricky to remove from a sheath,
depending on their design and location. Careful design cannot always help, and you
might find your sheath welts ripped up from the teeth over a period of time.
This is not only noticeable in leather welt sheaths, but even kydex
and aluminum framed sheaths can suffer from abrasion and ripping by
serration teeth.
- Serrations can not be used on the top spine of one of my
tactical knives if it is to reside in a locking sheath. This
is because the location of the locking mechanism is in the
direct line of contact of the serration teeth if they are
placed here, and the two will destroy each other. Serrations
on a spine of one of my knives must be coupled with a
tension fit sheath, which is less secure. A newer alternative
comes from my development of my counterterrorism knife sheaths. This
is a hybrid of my tension and locking sheath, simply called a hybrid
tension-lock sheath. This particular sheath uses tension of a
component that does not contact the serrations, but it is not as
secure as a locking sheath.
- Serrations on the spine of any double-edged knife may
cause other issues. For instance, if the owner wants to bear
down on the regular straight edge of the knife blade, or
wants to apply spine pressure with his thumb or hand
(typical for tanto knife secondary points), obviously this
can't be done of the serrations are there.
- Serrations on the spine of a knife require the knife to
be double-edged. This means double ground, often double
hollow ground, which can remove a good cross-section of the
spine. To have the same spine strength as a single-edged
knife blade, the blade must be wider. If kept the same
width, the knife is simply weaker in the spine because there
will be less metal there.
- Because serrations on the spine of the knife create a
double-edged knife, certain countries may not allow these knives to
be shipped or possessed. For instance, Australia prohibits the
import of double-edged knives altogether.
- Because serrations require brute force to rip, tear, and
cut, most of them should be called rip teeth, and they are usually placed near the
ricasso, not at the end of the blade. That way, more force at the heavier cross-sectional
geometry of the blade will support their use. If serrations
are put near the blade tip, it's possible that when they
snag, the force of the hand with the leverage of the blade
length may offer enough force to snap of the tip of the
blade, the weakest part of every knife. Sometimes, in
specialized knives, serrations are located on the top edge,
such as in specialized chef's knives, but not usually in
tactical combat models. Considering this, serrations on the
top edge of a double-edged knife should not start at the
tip, but slightly behind the tip for greater tip strength.
- The serrations may hang up, snag, and seize in cutting when you don't
want them to. You may be using your regular cutting edge, and have
the material you're cutting fall into the serrated part of the blade,
hanging up or snagging unexpectedly, and perhaps
ripping up a clean cut or causing hesitation that is undesired.
A finer serration or specially designed serration may reduce hanging
and tearing, but not always.
- The tip of the teeth of narrow serrations may break off, because sharp teeth
must be thin teeth. One of the military requirements I've had
is to make a tooth that will keep cutting even after broken. This means a thinner cross section, to make a more aggressive tooth.
- Serrations may be difficult to sharpen. They often are,
but thankfully I've included instructions to do that on this
very page. I use special equipment (diamond abrasive based cutters) to
make them and hone them, and that same equipment is not available in the field,
but diamond abrasive coated rods and tools are. Note that each type of tooth is different,
and requires its own sharpening regime.
Serrations: Advantages and Considerations
- Serrations can allow ripping or tearing through
extremely stubborn materials that a straight edge can not.
If a knife user encounters hardwoods, bone, horn, plastics,
textiles, and even tissue that resist cutting with a
straight edge, a well-designed and sharp serration can allow
him to rip through. This is the main advantage of serrations
on knives and it is substantial. I've even had military
clients rip and saw through the aluminum on a wrecked APC to
affect a rescue with serrations on my knives.
- Serrations can clear a cut. When a regular, straight
cutting edge cuts, it simply displaces the material from
itself, separating the material, but not removing it. So the
side pressure and potential for pinching the knife blade
increases as the cut deepens. Having a thin blade helps, but
the material is still there, pressing on the sides of the
blade. It's interesting to note that a hollow ground blade
has the thinnest cross-section, so that helps. Even the
thinnest blade does not remove material from the cut, and a
serration may well do that. It tears and rips through,
dislodging particles from the material, helping to clear the
cut. No where is this more noticeable than when ripping
hardwoods with serrations.Also, because the cut is rough,
the material being cut can help to separate the gap.
- Serrations can pierce. They can simply start a cut that
would be difficult to start with a slick, smooth, and sharp
blade. Some polished or very smooth surfaces can be
difficult to start cutting, and the serration point can
pierce these surfaces, allowing a traditional edge cut to
commence.
- A seldom considered feature of well-designed serrations
is that they will prevent an enemy from grasping a blade.
This may seem obscure, but this feature in serrations has
been known by Armorers, weapon makers, and warriors for
literally millenia. When a gloved hand tightly grasps a
straight, smooth blade, no matter how sharp the cutting edge
is, if it is grasped tightly, and the blade does not move
along the length of the blade, the edge simply can not cut.
In the warrior's combat knife, this is a devastating
reality. The blade can be grabbed tightly, and perhaps even
taken from the warrior. How serrations can prevent this is
that, if they are well-designed, grasping the knife at the
serrations will pierce even the best gloved hands, and the
enemy will have to let go. In antique swords and parrying
daggers, this was a distinguishing factor that prevented
grasping one another's blade.
- A serration can save the rest of the edge, the blade,
and possibly even the knife! For a simple illustration, try
cutting through a small piece of oak with a straight edge,
specifically cross-cutting (across the grain, not along it).
Even the sharpest straight edge will slide along it, and
then the temptation will be to start chopping on the wood
like with an axe. This is not how a thin, sharp cutting edge
should be used, and the likelihood of breakage is
substantial. I know of plenty of knives that have been
broken or had their edges chipped because they were used for
chopping, instead of cutting. This does not only apply to
woods; I've seen blades chipped while chopping bone. If the
serrations are present, and they work, the temptation to
chop with a knife is often averted, saving the blade as the
serrations do the cutting necessary.
- Serrations extend the cutting surface of the actual
edge, sometimes by many factors. A straight length of
blade is measured simply by the distance along the edge.
A serrated knife, because of the many curves, in and out
of the blade axis, actually increases the cutting edge
length significantly. You simply have more edge to cut
with on a serrated blade section. This adds to the life
of the edge.
- Serrations may outlast the regular knife blade. This is
often the case, due to several factors. The serrations are
simply less used than the regular straight edge length, so
do not wear as quickly. Also, serrations usually wear on the
higher points, that is, the most protruding parts of the
teeth. So the deeper edges in the serration simply see less
wear. Because well-designed serrations have thicker profiles
and cross-sections than straight edges, they last longer.
Sharpening is less often, and less of the serration is
sharpened away.
- Serrations can help to catch, trap, or snag
materials and items that are easily pulled away from
smooth, straight, slick, and sharp blades. Fibrous
materials like rope, line, or even some skins can simply
slide away from a smooth blade, but serrated blades bite
into the group of fibers and can help to trap and cut
them without sliding.
- Serrations can cut effectively, even when more dull
than the straight edge. This is because more pounds per
square inch can be applied to a smaller area, combined
with somewhat protected areas of the serrated edge.
Usually the most frequently dulled parts of the
serration are the points or most outward projections of
the serrations, which can leave the deeper edges of the
serration sharper for a longer period of time.
- Specialized serrations can be designed and made to cut
aggressively in one direction and release in another. This
is the function of canted (angled) serrations on knife
blades. This, in design concert with mechanical aids to
apply pressure in the cutting direction such as quillons,
mid-bolsters, and sub-hilts, can mean a very efficient
cutting direction and device.
- Serrations look more aggressive. Though I do not
include serrations simply for the visual punch, they do
add to the appearance of a blade in stylistic fashion.
Like some mirror polishes, on tactical combat knives,
they may add to the threatening appearance, perhaps
intimidating and threatening an enemy more than a slick,
smooth blade. Of course, this is not the main reason to
include them on a knife, though some factory knives are
made this way just to make the knife look more
aggressive. They must, as a primary consideration, add
to the cutting abilities of the knife.
- Serrations have derivatives, like line cutters,
hookblades, and gut hooks. These specialized features allow
specific results. A line cutter may be designed so small
line (such as monofilament) may be trapped and cut with one
hand, while the line slides down the arm and handle and is
snagged and sliced in one motion. Without a line cutter, one
hand must hold the line, and the other locate and slice with
the blade using a sawing motion. A hookblade is a
specialized blade that may allow cutting on the inside
curve, while protecting another area of contact. This has
been effective in certain rescue knives, where a hookblade
feature can be used to remove a wetsuit from an injured
diver without cutting his skin. Another application would be
extrication and the slicing of seat belts while not cutting
the victim. Clothes and even boots can be removed in
emergency medical care of the sick and injured without
injuring the victim with a knife blade. Gut hooks, used in
hunting knives, can be used to slice the skin of an animal
while gutting, yet prevent cutting the internal organs which
can spoil the meat. All of these features can be interpreted
as derivatives of the serration, or modified blade edge.
Page Topics

Canine serrations on the upper cutting edge of this
Lynx

Tough and useful Hammerhead serrations on this "
Raijin" Counterterrorism Knife
Just like all the other parts, components, and features of a fine handmade knife, serrations also differ
from factory, manufactured, or boutique shop serrations. A close look at any serration will give a clear and
distinctive knowledge of these differences and how they affect performance, service, trust, and value.
There is a major determinant factor between mass produced, factory,
manufactured, or even small boutique shop serrations (even if the shop
is named for a singular knifemaker) and serrations made by a custom
knifemaker. That huge singular factor changes serrations simply from
rough parts of a cutting edge to instrument-sharp adjuncts that amplify
the cutting ability of the knife by many, many times. The factor?
Mass produced serrations are created by a wheel,
a diamond coated serration wheel that has a corrugated surface and is
coated with diamond abrasive in nickel plating. These wheels produce a
generalized serration profile, typically just some waves, and the
serrations are shallow, not pointed, washed over, unsharpened, and
generally dull. They are always shallow.
Handmade serrations are made one at a time, by hand, with
a file. This is done before heat treating the steel blade,
followed by dressing by hand, individually after hardening and tempering
the blade, followed by singular finishing, polishing, and sharpening
techniques for each tooth and each depression, each convex and each
concavity in the serration profile. This results in a crisp, clean set
and arrangements of cutting edges throughout the length of serrations.
Every micro face, every thousandth of an inch is a cutting tool: razor
keen, with crisp, pointed apexes, chisels, and hooks. They are deep and
effective.
Some more problems with factory serrations:
- Factory serrations are usually ground from one side of the blade. This may seem unimportant, but I
believe it is a substantial difference than fine handmade serrations which are
ground from both sides of the blade. The reason this
is done is because it is cheap, like most things factory knife manufacturers do.
Well-made serrations created from both sides mean
careful registry and alignment must take place on each tooth, so that the tooth valleys and points match each other
and prescribe a line down the axis of the cutting edge. This makes a much sharper serration because the included
angles of two-sided serrations are almost always lower than one side serrations.
- Factory serrations are harder to sharpen.
You might think that being only on one side would make
factory serrations simple and easy to sharpen, but this
is not the case. Lots of material will have to be
removed from the one side of the blade where the factory
serrations are machined in order to achieve and maintain
a lower and sharper angle. With well-made double-sided
serrations, a few quick strokes are all that is
necessary to tune up the edges and points since they
have less surface area to cut away.
- Factory serrations are uneven.
Since these serrations are cut by dressed and formed
wheels, usually under automated processes, it's only
natural that the diamond plated grinding wheels wear down, and they
don't wear evenly. So, if your factory knife is early in
the production run, the contour of the serrations will
be a bit more even, but if it is later in the wheel's
life, they will be uneven and poorly defined. Fine
handmade serrations are each meticulously laid out by
hand, and tuned to each other for an even fit. While the
handmade serrations are hand-made, they are much crisper, angular
and agressive.
- Factory serrations are never crisp or well
defined. This is due to the process limited by
the machining technology. A grinding wheel, whether it
is silicon carbide, aluminum oxide, boron nitride, or
diamond coated nickel on steel or phenolic substrate
lacks extremely sharp, punchy and well defined valleys,
so the points on the serrations are always rounded and
softened. Contrast this with fine handmade serrations
which are clear and sharply defined because each cut is
individual and independently cut and each peak comes to
a definitive point. A crisp point means instant biting
and trapping, one of the main reasons for serrations in
the first place.
- Factory serrations do not extend up the
termination of the grind. Since factory
serrations are made by a machine alone, they can not be
deeply machined into the grind termination near the
ricasso. What this means is that they must be located
where the knife blade is absolutely flat and of uniform
thinness. In order to do this, the factory knife is not
radiused or contoured at the termination, it is
straight, flat, and squared off, making the blade to
handle junction weaker. The factory serrations also must
be moved away from the termination area, making them a
bit further from the handle. In some cases, this means
less leverage and less serration length overall. With
fine handmade serrations, the placement can be up nearer
the termination, even into the termination with
substantial strength and cross sectional thickness at
these first important teeth. This is most easily noticed
when viewing the knife blade from the side.
- Factory serrations have many convex
profiles. This is, again, due to the
constraints of manufacturing. Wheels used to cut these
serrations can not have deep valleys or peaks, only a
slight variation of the two. So the design of the
grinding wheel surface is simplest to have a combination
of convex and concave edges. Unfortunately, a convex
serration edge is the hardest for the knife owner to
sharpen, and must be done with tiny, narrow dressing
sticks, carefully aligned. Though convex serration
profiles do have their place, for most serrations, they
are not the ideal. Like a knife edge, a hollow ground or
concave edge has the lowest sharpening angle and thus,
the sharpest edge.
- There are never any points on
factory serrations. Looking at the serrations below,
you'll see extremely acute points on each tooth,
particularly in my Vampire style. This is due to my
history of making knives for military combat and rescue
use. My military clients request serrations that work,
even if the tooth is broken off. They are tired of
serrations in name only, where a few gentle curves and
valleys seem to be thrown on to the blade as an
afterthought. They don't bite, they don't grip, and they
don't tear and rip like serrations should do. Sharply
pointed serrations do, and they are the most aggressive
you will find. In all the years of making knives, I've
never had anyone ask for "gentle serrations that are
just a little more coarse than the straight cutting edge..."
- Factory serrations are never canted, angled, slanted, or arranged to accommodate
the knife handle, use, fittings bolsters or reinforcements. In fine handmade knives,
the serration works with the handle and blade design for specific cutting force application.
For instance, in many of my Patriot pattern and knives with mid-bolster handle arrangements (see the
Minuteman EL below), the canted serrations are designed to cut on pull and
release on push. This
is distinctly custom and based on the knife owner's use and requirements, something not offered
on factory knives, boutique shop knives, or poorly made knives.
- Factory serrations may be soft!
This is a seldom discussed fact about factory or poorly
made knives with serrations. A knife blade is (or should
be) roughly ground, with most of the material removed
from the blade, all holes drilled, all machining that is
to be done on the blade completed, and then followed by heat
treating (hardening and tempering). That means that the
serrations should also be machined, filed, cut, ground,
and shaped BEFORE heat treat, followed by hand-polishing and simple
sharpening after. This way, the serrations retain the
temper of the blade. In poorly made serrations, they are
machined and ground AFTER heat treating the blade, which
can overheat the serrations, losing the temper. This is a
particular concern because of the high speed of the wheel that cuts
them. A thin
and narrow section of the serration (the points or the
very cutting edges) will be the first to lose temper and
soften. This is another reason factory serrations are
left without thin areas, because they may bend in use
due to loss of blade temper! In fine handmade
serrations, only the sharpening occurs after heat treat,
and in my knives, I finish grind and polish under water to keep the
blade cool and preserve the hardness, and each serration cutting
surface is sharpened by hand. The serration is
harder, more wear resistant, and (in stainless tool
steels) more corrosion resistant, and better all around.
Page Topics

Angled canine alternating tooth serrations on this
Minuteman EL
There are many different types of serration grind, profile, and type
of tooth and edge surface, even on my own knives, much less other knives
by other knife makers, factories, manufacturers, or sources. I can only
speak to my own serrations and my own experience making knives for over
30 years. There are many factors within my own knives that determine
serration type, style, length, and design.
What a knife is expected to cut is one factor of serration design. The length of the serration
available on the knife, the placement of the serration run, and the
angle of the serration grinds and teeth are all important geometric
considerations. I also consider the steel type, main grind
geometry, handle support features, corrosion resistance, and sharpening
service factor of serrations to produce and provide viable, useful, and
dependable serrations that can be serviced by the knife owner. Because
of all of these factors, serrations and their geometry varies, sometimes
greatly, even among my own knives.
My Predominant Serration Types
- The most popular serration style I create is my
Vampire
rip tooth serration. The Vampire consists of alternating diameter
of grinds (yes, just like a blade, a serration has a grind), and when
you examine a pair of these grinds, the protruding teeth looks like the
grimace of a long-toothed old Nosferatu. The key to the aggressive
nature of these serrations is the alternating sizes of the grinds. No
tooth is the same size, so each tooth will attack the material in a
slightly different location, which makes for very aggressive cutting and
ripping. This type is the most requested type of my serrations, and most
of my military and professional grade tactical combat knives that have
serrated blade areas have this type. The Vampire is easily serviced and
maintained, so field sharpening is possible as a regular service aspect
of the knife. Example below.
- A variation of the Vampire is the
Canine.
Like the Vampire, the Canine has alternating grind geometries, but the
sizes are distribute in a two-to-one or two-to-two grouping instead of a one-to-one or
alternating pattern. So the pair of two small grinds placed between the
larger grinds gives the appearance of a dog's or wolf's front mouth, two
large canines separated by smaller teeth, thus the name. It is a more
aggressive pattern than the Vampire, and can be suited to longer runs
along the blade length. It, too can be hand-sharpened in the field as
part of the regular service aspect of the knife. Example
below.
- A simpler version of serrations is my
Barracuda.
The Barracuda, just like its namesake, has an evenly sized run of small
teeth for a smoother cut than the Vampire of the Canine. This is not as
aggressive as the previous two, and lends itself well to even cutting
with less ripping. Less ripping and tearing means less hanging or snagging in the
cut, so this is an easier serration to use as it requires less force.
The Barracuda can be easily sharpened in the field. Example
below.
- Smoother still, yet very aggressive is my
Micro-Blade
serration. The micro blade consists of separated serration grinds with
small sections of regular blade length between them. It is a serration
that excels in smoothness, with less ripping, and can cut a wider
variety of materials with limited tearing, ripping, and hanging. It's a
great adjunct to specialized knives, like my EOD (Explosive Ordinance
Disposal), bomb-tech, haz-mat, and disaster rescue team knives. It is a
bit more complicated to sharpen in the field, but can be done by hand
with the right equipment. Example below.
- My Piranha
serrations have a smooth micro-edge but noticeable
alternating concave edges, one rounded, and one with an
internal chisel shaped square edge. This allows a
smoother cut than the Barracuda, but more aggressive
cutting than the micro-blade and improved trapping for
textiles, woods, and other fibrous materials. Sharpening
is a bit more difficult, as it requires a square edged
stone or rod to sharpen the square concavities. I also
offer this serration in a larger size for heavier duty
survival, combat, rescue, and emergency response knives.
See the Large Piranha example below.
- My Hammerhead
is a very large and substantial evolution of the
micro-blade, with deep concavities alternating with
chisel-knife edges that are very stout and strong. This
is a hardwood-gobbling tooth set that is very tough and
resilient, and unlikely to chip, break, or dull. Being
large, it's also easier to clean than tight or complex
geometries, increasing corrosion resistance and easing
blade care. It's very interesting that Gerber added my
serration type to their knives in 2008, after I had introduced
the serrations in my counterterrorism and Pararescue knives.
However, like most manufacturers, they did them wrong, with cuts
only from one side. This is because of the difficulty of
alignment of automated serration grinders, and thus, they are
too thick to be as effective as hand-cut serrations. My
hammerhead serrations are the main choice of my counterterrorism
teams. Example
below.
- A specialized serration I use is my
Theatre Curtain.
Like the draping theatre curtains of old-time stage shows, the
serration is a group of large convex grinds in a hollow ground
edge. These are not scallops; scallops are concave with
sharpened points, in essence my "Double Hollow" serrations
described just below. These are actually convex, so this is why
they are named "Theatre Curtain." There is some confusion here,
since only a couple knife manufacturers call this a "scalloped"
serration (Wusthof), but the main mass of knife manufacturers
describe "scalloped" as concave geometry of repeating cuts in
the blade with points, like my Double Hollow below. Currently, I'm only using this on my large bread knives,
as it aids greatly in piercing and slicing hard-crusted breads
while leaving a minimum of crumbs. If you're comparing
serrations, you'll notice that this type of convex
serration profile is coming up more and more in manufactured and
boutique shop knives. Examine them closely and you'll see that
they are poorly made, mostly ground on one side, making a
thicker, less sharp edge. This is because they are ground by
profile grinders, and they are never, ever as keen and thin as
serrations on the best handmade knives. Example below.
- A smaller version of my Theatre Curtain serrations is my
Mini-Curtain.
These are similar to the larger version, but much smaller.
Again, these are not scallops. They
are made in a hollow ground edge, and because of their size,
create few crumbs when cutting hard-loaf breads such as boules
and braided breads as well as filled breads (meats, fruits,
vegetables baked-in).
- In some kitchen knives, it helps to have extremely thin
serrations with gentle, sweeping curves. This is created in my
Double Hollow serrations. They are concave
(hollow) in profile, and ground into a hollow-ground blade, so
are extremely thin. They are useful for hard breads, flat
breads, bagels, and tomatoes as well as other vegetables.
- Other styles
are created individually, and I'm sure to create new ones.
I'll post and describe them here as they become available,
so please check back on the site, as it is continually
updated.
Page Topics
Please click on knife blade serration thumbnail photos

Barracuda

Vampire

Vampire

Canine
 between deep serration cuts and are very sharp but do not hang up or tear like rip teeth")
Micro-Blade

Theatre Curtain

Piranha

Large Piranha

Large Piranha

Hammerhead

Hammerhead

Hammerhead

Hammerhead

Mini-Curtain
 within a hollow grind, good for bagels, tomatoes, vegetables")
Double-Hollow
With well-designed serrations, it is snagging that is the main
concern: trapping the blade and not being able to apply great
cutting force because the blade won't move.
Modern knife blade serrations are used as described above, for
tearing, ripping, and cutting through tough and stubborn textiles, wood,
bone, horn, and plastics, where ripping speed is more important than accuracy.
They are used on my tactical combat knives for trapping and severing tough cords,
ripping through materials, and in combat. They are used in chef's knives
for opening and piercing skins, crusts, and peeling.
You might read reviews by some that claim serrations
should be far out on the belly and near the point of the
knife blade, and not near the ricasso and handle. The theory
behind this is that you might need a tough sawing action
near the point, and a smooth cutting surface with more
control nearer the handle. This may have some merit if you
believe that you have greater or lesser control at a certain
position along the knife blade, but in most knives, control
of the blade is an issue based on the geometry of the blade
and handle, the size and weight of the blade, the hand strength
(or lack thereof) of the knife user, the nature of the
material being cut, and the actual task at hand.
All knives should be capable of being controlled,
whether they have serrations or not.
The most important reason to place serrations near the ricasso of the
knife is force and torque. Because serrations can hang, grab, and bite
into the material being cut, the knife user will apply more force to
make them move, free them up, and complete the cut. In combat knives,
this grabbing force and being able to control it is critical. Because of
mechanical leverage, more force and control can be applied to both use and free the
serration when the serration is nearest the handle.
If you don't believe me, try this experiment. Grab the end of a three
foot long bar of steel. Have a friend grab the bar with his hand very
near yours. Tell your friend to try to hold the bar horizontal, as you
try to force the bar to pivot downward. This will be very difficult.
Have your friend then grab the bar at the far end. Tell him to hold the
bar horizontal. It will be very easy for you to move the bar downward,
no matter how hard he grasps it. What this demonstrates is the simple
mechanics of a lever. The longer the lever arm, the less force it takes
to hold one end as the other is moved. This same force mechanics applies
to the serrations of a knife. If the serrations hang or trap, you must
be able to apply great force nearest the serrations to free them. If the
serrations are at the tip of the blade, they can bite and trap in
material, and you will not be able to transfer as much direct force to
free them. You must be able to free the serration or your knife blade is
trapped. To transfer the most energy and force, the serrations need to
be nearest the handle. This factor is easiest to realize in machine
tools. Cutters, mills, and saw blades are chosen and kept as short and
compact as possible to transfer the greatest amount of energy and
control to the cutting edge and limit flexing. Another critical factor
in knives is lateral flexion. If the blade is trapped at the tip in a
serration, and a sideways force is applied at the handle, the mechanical
leverage may be significant enough to snap the tip of the blade off.
There will be exceptions to this, of course. A good example is a
chef's knife that has a serration length at the tip to pierce skin
before slicing on the main blade. But this is a specialized knife and
not a combat weapon or tool, and is not expected to experience extreme
motion, forces, or impact.
Using serrations to cut depend on the knife, type of serrations, and
the task at hand. If they are sharp, great force is not necessary. For
example, with my Vampire serrations, usually the weight of the knife
blade alone with a back and forth sawing motion will cut through most
hardwoods, even rock maple. Most plastics give way easily to serrations,
and rope and line are easily severed with a twisting motion. This is another reason not to have tip serrations, as twisting a trapped
blade will most surely snap the serrated tip.
Some serrations are canted, that is, slanted in one direction. My
Patriot knife pattern typically has this type of serration. This allows
tremendous ripping force in one direction (pulling) while releasing in
the other (pushing). In a knife designed with canted serrations, it is
important to add extra features to apply even greater force to the
teeth. This is why the Patriot has a mid-quillon supported by a
mid-bolster (sub-hilt). This allows tremendous hand force to be applied
to the serration.
In my Micro-Blade serrations, a different type of cutting
action takes place. These are very smooth serrations,
interrupted sharp blades with deep, sharp hollows. This type
of serration is less likely to hang, but not as aggressive
on hardwoods and tough plastics.
The length of serrations varies, but I typically don't make
them any less than 1.5" of the blade run. This is because
any smaller than than are not enough teeth to engage the
cutting chore with sawing motion. If the style and geometry
of the blade permits it, I may make serrations along an
entire edge length. This may be different on each knife.
I rarely, if ever, create serrations that are both convex
and concave. This is typically what you will see on factory,
manufactured, and throwaway knives, and they are ground by
automated contoured wheels. Most people cannot sharpen these
mish-mash of geometries, and the long-term service of a fine
handmade knife should be considered. I want my clients to be
able to use and sharpen their works, over the life of the
blade, which should be decades. More on sharpening below.
Page Topics

Terrifying and sharp vampire rip tooth serrations on this "
PJSK
Viper"
Being able to sharpen a knife includes sharpening serrations.
It is not complicated, but simply a procedure of the regular maintenance of the knife.
"If i get 8 hours to cut a tree i'll spend 7 hours to sharp my knife."
--Abraham Lincoln
There are several good models of rod-type sharpeners for sharpening serrated knife blades.
Most of these are tapered, so will fit a wide variety of serrated grooves and edges. Like
a knife blade, the serrations should be sharpened when necessary, though this is much less
frequently than the main blade edge. The best rod-type sharpeners to use for the serrations are
diamond abrasive coated. Since these rods are usually tapered, they can fit a variety of
serration profiles. They can be used to sharpen line cutters, gut hooks, and even the
recurve area of some blades.
There are advantages and limitations for all types of diamond
abrasive coated rod sharpeners, and here are some comparisons. The rods
shown here are not all of the available types, and there are always new
ones.
Page Topics

Rod Sharpener Brands and Features
I've included some of the most common and accessible rod sharpeners here with some worthwhile facts for
you to consider. Prices for these sharpeners is modest, and at the time of this writing, they can be purchased
on various internet sites and sources from about $8.50 US to over $20.00 US. Details follow the picture above by
brand, from left to right.
- RUKO 040-CS Straight Combination Sharpening Rod: RUKO
(A Canadian Import Company and made in China) calls this a sharpening stick, and it has some
worthwhile features to consider, as well as limitations. The package
contains no instructions, only a list of "features." The rod is straight,
not tapered, so will not fit a variety of serration
profiles, only one, which is about .250 or 1/4", the main diameter
of the rod. It has a flat side, which can help in sharpening small
straight or possibly convex sections, and also a groove which can
sharpen fish hooks if you're so inclined. The large diameter rod
might be handy when sharpening gut hooks, large line cutters, and
even the recurve areas of some blades, and with finesse, you may be
able to sharpen combination convex-concave serrated pattern runs.
The package description claims it is a 4" Combination Diamond Rod,
but the actual measure of diamond coated rod that you can sharpen
with is less than 3.25"! The idea for the rod handle and storage is
decent: a cinch-type split barrel collet and a knurled ferrule
allows you to store the rod safely inside the aluminum barrel, which
has a tiny nickel plated pen clip. Unfortunately, on my model, I had
to bear down with some seriously hard pressure to get the body to
tighten on the rod, and even after I did, you could still tug it
from the holder because it grips on the smooth, polished, plated
part of the rod which is slick. The diamond abrasive particles are
claimed to be Medium 400 grit, so it's quite aggressive.
- RUKO 041-CS Combination Sharpening Rod: Like
the RUKO 040 above, this sharpening rod has several features and
limitations. The package contains no instructions, only a list of
"features." The actual rod has two sections, and is reversible. The
first section has the same geometry and diameter (.250") with a flat
side and a fish hook sharpening groove as the 040 detailed above. The other section has a
taper which runs from .250" to .075" diameter. An issue is their
description on the package card again, which claims the rod to be
4". The straight section is 2.5" long, and the tapered section is
2.5" long, so I don't know where they are getting their measurement.
Perhaps they should call it a 5" rod! The barrel/collet-knurled
ferrule holder grips much better than the 040 model, because the
smooth, nickel-plated section is small, and the diamond abrasive
coated particles will not allow the rod to easily slide. A drawback
would be the very short length of the tapered rod, which is so
abrupt a taper that you will be hard-pressed to get a 1/2" long
stroke for your serration sharpening geometry. The whole combination
idea is nice, though, so this sharpener might get you through the
widest variety of serration sharpening tasks on those knives that
have concave-convex serrations.
- Schrade: The Schrade serration rod
sharpener (made by Taylor Brands in China) Arrived
without even a descriptive card of features, in a box
with a folded paper insert describing their knives. I
have to note that the insert did have a section on
Resharpening Your Knife, but it did not mention anything about
sharpening serrations or even a word about the very sharpening rod
in the package. I have to go on here, because this is a bit
humorous. The sharpening description says, "hold the blade at a
107 to 157 angle from the surface of the sharpening stone" to
sharpen. I suppose that because this is printed in China, we are
supposed to understand, first, what a 157 angle is. Is that
degrees? Because if it is, this must mean an obtuse angle measured
from the side you are not sharpening... very confusing. Add to that
that the angle is all wrong, and 157° would
mean a 23° angle of the edge, the absolute maximum for sharpening.
This would mean that the 107° angle was actually 73° from the stone!
This would create a cutting edge that is nearly square, destroying
the knife blade and making it the dullest possible blade in history!
It's interesting to note that they spend twice the words in their
"Consumer Awareness Statement" warning the owner that they
are not responsible... okay, I couldn't help it; this is
typical of products with an American name being made in China. The rod is the
cheapest of all of these I'll describe, and it has some features
and limitations. A neat thing is the hard, rubber-ish pen-type
holder, which accommodates the rod for storage or use by
simple taper pressure. The actual rod is fairly short,
3" long, and has an abrupt taper from about .310" to
.050" which makes it way too abrupt to get that
important 1/2" long stroke. The rod has about a 1" long
groove for sharpening fish hooks, which is almost too
short for that. But if compact is what you want, and you
like short-stroking, this would be the cheapest route to
go. Like the RUKOs above, it has 400 grit diamond
abrasive.
- Lansky Diamond Tapered Sharpening Rod: This
company sells a lot of sharpening products, but
specifically, this diamond abrasive coated rod that they
call a "Rat Tail Sharpener" is what
I'll describe here. It's interesting to note that Lansky
boasts over and again in their company profile the size
and magnitude of their distribution
center, and that it is located in Henderson, Nevada.
You'll be hard-pressed to then find out that these products
are actually not made there, or even in this country. When I received the
clamshell package, a proud sticker was strategically
placed, claiming "Lansky Sharpeners- 30
Years-Quality and Innovation" Hidden underneath was
the required statement that these are actually made in
China. Did they place their sticker right over the "Made in
China" logo on purpose? Hmmm. Okay, this sharpener for serrations is a step in
the right direction. The rod is actually 3.5" long, and
has a more gentle and useable taper from .237" to
.067" in diameter, so that critical 1/2" long stroke is
more realistic than the previous types. The diamond
abrasive is finer, though they do not disclose the grit
size, merely claiming "Fine Grit." I'm guessing
it's about 600, but that's just a guess. They do include
instructions, but they are not specific, merely claiming
to "slide it straight down the rod with moderate
pressure." Repeating this process often enough and
you will destroy your serration profile. Advice: follow
the instructions below. For the handle, Lansky has
attached a butterfly (Balisong or fan) double pivot
knife style handle, so the rod folds into the handle
conveniently. The pivots are, unfortunately, plastic, so don't
expect this to last. The handle is a bit bulky, with ribbed
rubber grips that are really not necessary, particularly
since they are not in outer edge contact with your hand
when open, only when closed. But they are a convenient
place for the Chinese to place the Lansky name (distributed
in the US). The
handles have a little tab and slot arrangement to stop
them from sliding around when opened. This is a decent
serration sharpener, at a decent price.
- DMT DiaFold Serrated File: Made by
Diamond Machining Technology in Marlborough,
Massachusetts, this is an actual United States company
making fine diamond abrasive products right here in the
United States of America. They make many of the diamond
sharpening tools used in machine shops to sharpen and
touch up the hardest of machine tool cutters, inserts,
and ultra-hard edges. As you might expect, this is the
best serrated edge sharpener, and also the most
expensive, at about $20.00 US. The length of the rod is
just under 4.5" long, and the taper is a gentle one,
from .248" to .615" in diameter. So the critical 1/2"
long stroke is possible for a greater area than the
other models. The DMT serration files (file is a better
name, because that is what they are) are available in a
variety of grits: coarse, fine, and extra fine, so
tuning a serrated section from rough to extremely keen
is possible. The fine grit seems to be about 600. The
handle is a butterfly (Balisong or fan) style just like
the Lansky above, but has some nice features. The pivots
are steel roll pins, not plastic and the handle has
square detents and tabs that hold the sharpener both
closed and open. In the open position, it has a double
tab and socket to stop handle misalignment, and the tabs
are curved and deeper than the Lansky for smoother
indexing and a more solid fit. Though it is actually
larger than the Lansky, it weighs about the same (no
unnecessary rubbery grips). The DMT comes with ample instructions,
though not as detailed as I will give you below.
So, there are the players. You may be influenced by the size,
convenience, and carry possibilities of all these types, or you may
actually need a fish hook sharpener with you, so none of these are
exclusive.
By the way, as on the rest
of the site, I don't get paid to do these reviews, don't
receive free merchandise, exposure, or any benefit in
any way from any company or anyone. This is not an endorsement
of any kind, just a service I present to my clients, tradecraft and
anyone with knife interests.
Page Topics
 combat tactical rescue knife in 440c high chromium stainless steel blade, 304 stainless steel bolsters, canvas micarta phenolic handle, kydex, aluminum, nickel plated steel sheath")
Extremely sharp and aggressive Vampire rip-tooth serrations on
this PJLT

Position the knife parallel to and at the edge of a bench or table. Place the spine
of the knife (back of the blade) against the table, the point of the blade
away from you, and the serrated edge to be sharpened straight up.
Please click on photo to enlarge.

Determine the diameter of the serration on your knife. Lay the sharpening rod against the serrations
while looking down, and determine the area on the rod where the
circumference of the rod most closely fits the circumference of the
serration. On sharpening rods that have long handles, you may have to
position the handle overhanging the edge of the bench or table to see
this.
Please click on photo to enlarge.

Mark the rod. Once you have determined the location on the rod that matches the
curve of the serration, use a permanent marker (Sharpie® or other) to mark a girdle on the rod.
Continue the mark about ½" down the rod (toward the smaller end).
This girdled area will be where you contact the serration to sharpen
it. On some knives, the area being sharpened has a larger
circumference than the rod (such as gut hooks, line cutters, and
small recurve areas on the blade). In these cases, mark and use ½"
length of the largest diameter of the sharpening rod possible,
usually nearest the handle.
Please click on photo to enlarge.

Position
the rod at the sharpening angle. On polished or brightly
finished knives, you do not want to gouge or scratch the grind of
the serration, only the cutting edge. To do this, gently place the
rod, pointed end up, into the groove of the serration, feeling the
angle that the main serration is ground. Once you can feel that the rod is laying in the main grind of
the serration, lift the handle of the sharpening rod slightly. This
will establish the angle of the cutting edge that differs from the
main grind.
Sharpen. Lightly move the rod forward and backward
along your ½" marked girdle to cut the edge of the serration. Do not
use heavy pressure. Diamond abrasives work best at a light pressure,
and no lubrication is necessary on any diamond sharpener. Do not lower the handle, or the diamond
rod will scratch the main serration grind. Maintain the sharpening
angle as accurately as possible.
Please click on photo to enlarge.

Repeat the same positioning technique and sharpen
the other side of the serration if the serration has one. Some
knives are only ground on one side of the serration.
Remove the
burr. If you have done this properly, you can see or feel a tiny
burr on the opposite of the last side you sharpened. Now, only using
one light ½" stroke, sharpen off the burr. The serration should now
be sharp.
Please click on photo to enlarge.
Wider serrations. Some serrations are wider than the circumference of
the rod. Gut hooks, hook-blades, line cutters and other specially shaped
large diameter profiles on knife blades are often of a larger diameter
than the rod. To sharpen with a smaller diameter rod, use the largest
diameter of the rod, usually near the handle. Establish the angle as
above, and when sharpening move the rod along the entire edge, twisting
the rod with your hand as you sharpen. This twisting motion will help
prevent waviness on the cutting edge. It takes a little practice to get
a smooth cut; take your time and clean up the burr for a final smooth
edge.
Sharpening Theatre Curtain Serrations
(including my Mini-Curtain) are a special case, and people often wonder
how these are sharpened. The first thing to consider is that I use a
high precision, extended, and complex heat treating cryogenic method
that results in a blade that is in the pinnacle of condition. To the
chef, this means that a curtain serration will unlikely ever need
sharpening in his lifetime. These knives are not like manufactured
knives or other maker's knives made from poor, plain carbon,
pattern-welded (decor) damascus, or low alloy steels. They do not
require constant sharpening to stay tuned up and ready to cut, and that
is the first point.
However, after a generation of use, a curtain-serrated knife might
need sharpened. To do this, the spine is taped off for protection from
scratches, and several light draws with a diamond abrasive micro file is
all it takes to bring them back to maximum sharpness. These files (the
flat side of the half-round, the three-square and the square) will work into the V-grooves and over the
convex areas easily. Just follow the original angles, and finish exactly
like the concave serrations above. Just make sure the abrasive is diamond, as ceramic
and other stones won't sharpen these T3 cryogenically treated knives!
Since it will probably be your grandkids that receive these knives,
they might appreciate this information, long after you (and I) are gone.
So I'll be sure to leave a copy in the Library of Congress so that they
can look it up!
Page Topics

Wide and deep angled line cutter on this
Flamesteed


 between deep serration cuts and are very sharp but do not hang up or tear like rip teeth")


 within a hollow grind, good for bagels, tomatoes, vegetables")


