Jay Fisher - Fine Custom Knives
New to the website? Start Here

"Cassiopeia"
Whether you call it a shop or a studio, this is the place where all of the creativity and execution happens. It's a simple and yet sophisticated and sometimes complicated place, filled with equipment, supplies, and work areas. There isn't a spot that is unoccupied, not a place that doesn't have some critical purpose to the tradecraft and art.
Here, you won't see the typical layout of equipment and generalized photos that knifemakers typically post. If you've seen one knee mill, you've seen them all. If you've seen one belt grinder, you've pretty much got that part of knifemaking in perspective. What I'll try to do for those reading this is to give a deeper, closer perspective on my art and trade, with some insight into how, why, what, and where these individual compartmentalized tasks take place. You'll forgive me if I may, once or twice, boast about my studio; it's taken decades to put this all together and to make it all work, and it's the place I spend most of my time, year after year after year. The photos on this page can be enlarged by clicking on them, and there is no particular order to them so you can get an idea of the variety of work I do.
Someone once said that looking in my studio was like looking into my mind; I certainly hope that's not the case! My mind is much more organized, and hopefully more complex. Sometimes the studio is just a total mess, and I hope my brain isn't quite as casual!
I work hard to make sure that every device, component, machine, and part in the studio operates correctly, and continues to work, or there's no reason to have it. Parts must be stored, certainly, but they are support items critical to the dedicated device and machine and are not the focus of attention. There is always some machine, tool, or component that is down for repair, not quite working correctly, or needing an upgrade; this is the standard fare for most machine shops and artist's studios.
From my perspective, a knifemaker is not a simple worker; he's a technician, a craftsman, and, above all, an artist. If it's simple repetitive tasks that are performed, one might as well set up and program a machine to do them, for the human factor is not necessary. The shop then becomes the studio, where all is seen through the eyes of the artist and creator, including every piece of equipment, rack of storage, or station for dedicated tasks.
...I enjoy your writing, colorfully injected with humor. I appreciate the work and knowledge base required to produce the works of fully functioning art you've pictured. I understand the research and diligence required on your behalf to have become top notch in so many fields (lapidary, leather tooling, computer knowledge/website design/script writing, and many more) makes you and your product one of a kind. The hours and dedication required to accomplish these feats is staggering. You have accomplished and mastered multiple specialties. Most will attain one, if that. Further, I appreciate your ability to articulate your thoughts utilizing proper English, grammar, and punctuation. That ability, pride in end product, and respect for the reader is rare these days; more and more people are using text lingo/slang in business writing. Thank you for taking this reader through the steps and equipment used and needed to offer such fine knives; a journey through your history as a craftsman, who clearly loves what he does to the point of learning other crafts in order to further his ability to offer the world a fine knife/work of art/investment opportunity/legacy item for generations to come. You are an amazing man and one who has every right to be proud of his accomplishments. I am truly amazed and inspired.
Thank you for your time if you have the opportunity to read my email, and in advance regarding an answer if you are kind enough to send a reply. Should my email not reach you, I am thankful still for having found such a valuable source of information in many fields. I hope to one day be able to own a custom piece made by you. Finally, a purchase my husband not only won't fight me on, but will happily help me with the decision making.
Best Regards,
Christina Coffman, GJG
| 1. Morning in the studio | 2. Cutting turquoise in the lapidary saw | 3. High speed utility motor | 4. Drilling a knife tang |
| 5. Hand-engraving a cast bronze pommel | 6. Gas Tungsten Arc Welding | 7. Carving wax with an air motor drive | 8. Frictionless static wheel balancer |
| 9. Edge marking | 10. Acid and Caustic chemical storage | 11. Sawing thick aluminum | 12. Gemstone inlay (1) |
| 13. Gemstone inlay (2) | 14. Gemstone inlay (3) | 15. Cutting Leather Shoulder | 16. Tenoning Jig in Table Saw |
| 17. Lapidary cabochon copier | 18. Tang reduction | 19. Repairing small milling machine head | 20. Lapidary saw feed speed reducer |
| 21. Making HULAs | 22. Lifting surface grinder Head | 23. Welding 304 stainless steel artwork | 24. Grinder nest |
| 25. Tuxedo cat | 26. Roll abrasives | 27. Bur and drill dispensers | 28. Small rotary tool dispenser |
| 29. HULA ball joints | 30. Saw blades and hand files | 31. Machine-engraving locking sheath instructions | 32. Honda Trail Saw |
| 33. Small works bench ventilation | 34. Dust collector head | 35. Dust collector full | 36. Scissors rack |
| 37. Lapidary arbor | 38. Lapidary arbor (2) | 39. Blade pattern layout | 40. Flat abrasives sheet |
| 41. Abrasive grinding belts | 42. Modular sheath accessories | 43. Sheath accessories and hardware storage | 44. Liquid nitrogen transfer |
| 45. Tapering a tang, scalloped cut | 46. Tapering a tang, flat platen cut | 47. Tapering a tang, disc grinding | 48. Handmade chest, frame assembly |
| 49. Cedar chest, exterior | 50. Cedar chest, interior |

Early morning, the springtime sun peeks through a north-facing window of the studio.
With the lights off, early morning arrival at the studio is a shadowy affair, and I have to watch carefully that I don't stumble over some project, chair, or air hose that I didn't put up the night before. In the dead of winter, days are so short that I'm always arriving in the dark and departing in the dark. In summer, there is daylight on both ends of the daily work cycle.
I've been lucky, blessed, or perhaps cursed (depending on how you look at it) with the obsession of working every day on my goals. I usually work a minimum of 10 hours every single day, and I love what I do. It's not too terribly uncommon for me to put in a 15 hour day, starting at 3:00 AM and finishing at 6:00 PM. The space that I've created to do it is a unique affair, and it's always in transition, evolution, and rearrangement, as all artistic studios should be.
The predominant visual in this photo (apart from the sun's flare) is the Larin vise in the foreground. I have many vises, and there are great and endless uses for all of them. Most of them are made nowadays in China, and the Chinese are very good with cast iron. I have a multitude of different jaws, jigs, and clamping accessories for the vises, and the best ones swivel in every axis. Heavy vises should be mounted on heavy steel tables, and access to the work area around them are essential. This vise has aluminum block jaws to prevent marring on harder materials, and it also acts as a heat sink to pull away excess heat from aluminum and steel parts when forming them. You may be scratching your head at this ( a vise for a heat sink) but it makes perfect sense to me!
I've actually broken a few vises in my day. Mostly it was because I abused them, pushed them beyond their design idea and ability. It's good to know your limits, and snapping a 6" wide cast iron jaw frame will alert you to what that limit is... like the crack of a rifle shot!

A block of turquoise from Mexico is chucked in the vise of the gravity-feed lapidary saw. This is a 10" saw (it has a 10" diameter blade), and it runs incredibly fast. How fast? The blade is zinging along at about 5000 surface feet per minute, or about 60 miles an hour. There is a balance in lapidary cutting between speed of the abrasive cut and the ability to carry the coolant fluid into the cut and the ability to wash grit (cut stone) from the cut trough.
The coolant used in this saw (and in most good lapidary saws) is a refined mineral oil. It has a very high flash point, so won't ignite if a spark occurs (and they do). You can't see the coolant in this saw; the sump is out of sight of the camera, below the catch tray on the left side with the round perforations in it. The catch tray catches the slab or piece of stone that has been cut.
The vise arrangement is a bit unusual; it has a set of paired pins that the back jaw engages for a variety of widths of rough. By the way, an uncut stone is called a rough. Another unusual feature of this saw is that it is a gravity feed saw. Rather than have a motor advance the vise and rock into the blade, the tray is pulled along by a set of pulleys, cables, and cord so that a weight, hung on the loops at the front, will pull the rock into the blade.
This is an old saw, made just after WW2. The thing about lapidary saws is that they will last forever, as the parts that wear out: blades, bushings, bearings, and motors, can be replaced. The frames, tracks, and bodies never wear out since the movement and wear potential is negligible.

The shop is filled with electric motors. The center of focus in this photograph is the black 5000 rpm high speed motor. This is an unusual animal; a direct current brush motor that is shunt wound, and is 1/10th of a horsepower. It maxes out at 125 volts. You can see the Variac (variable rheostat) at the right edge of the photo, which has a bridge rectifier to convert the alternating current to direct current.
This is an extremely useful motor and arrangement. Decades ago, when I made this piece of equipment, I disassembled the motor, turned accurate threads on the shaft, and fitted it with a plain 3/8" chuck. While you may think that this is a simple tool (and you are correct) you might be surprised at its versatility.
While being shunt wound DC, simply varying the DC input voltage varies the speed. Since it's wound this way, it has no current control, so the slower it spins, the weaker the power. While in most situations this is undesirable, it can act as a limiting effect in heavy pressure. Overload your work and the motor simply stalls, preventing burning, ripping or dangerous slippage of the work.
What kind of work? Everything from small buffers (wheels, bobs, cones, and splits) to wire wheels, small flap sanders, Scotch-brite wheels, burs, rotary files, and even the hardwood slickers for leather sheath edges. Anything that can be clamped in the chuck can be used. Though it's reversible, I never use that option. I've used this motor about 30 years and never changed the brushes and changed the bearings only once.

The drill press is probably the most commonly used and most underappreciated machine tool in the shop. It's simple enough; a twist drill is chucked into a traveling spindle (quill), controlled by the hand, and advanced into the work on the table.
Here I'm drilling a tang for a knife that will have a gemstone handle. I'm removing a lot of "meat" from the tang, and this, in addition to tapering the tang will allow a dense material like gemstone to be mounted on the handle without adding extra weight. One of my best compliments of my gemstone-handled knives is their great balance, and it's taken a long time to get a "feel" for what the balance will be on a knife blade before the blade is even ground.
A large diameter bit is used after bolster pin holes are drilled. I use a standard cast-iron cross vise as a rest for this operation. The cross vise is not a milling table or a travelling vise, and the standard drill press cannot be used as a milling machine. The cross vise simply allows a universal positioning of the support for drilling (in this case) or the clamping and positioning of the work or support blocks in other drilling operations.
While people like to see the mills, lathes, pantographs, and other more notable machine tools, a good drill press is essential for many knifemaking operations. The support face of the work has to be squared with the spindle, and the machine cleaned and adjusted and maintained. This particular drill press has a 17" (distance from the spindle center to the column) and has 16 speeds and is driven by a 3/4 horsepower motor. It's bolted to the concrete floor, and this is an important thing to do for stability. I've used it so long that I've replaced all the bearings and even the chuck... twice.
By the way, you'll often see that holding onto the work while drilling is a very bad practice; for safety it's usually recommended that the work is clamped. But if you are well-experienced, and can judge when the bit is about to break through the work, and are a knifemaker in constant production, your hands can easily control this operation. But I would not advise this for the novice. This is one of those things where 40 years of practice and experience helps.

In the photo, I'm hand-engraving a bronze sword pommel. Usually, the object to be engraved will be clamped in the engraver's block, a rotating vise that allows a fair range of positional control. It supports the piece that is being engraved, and keeps the focal distance fixed. But here, I'm simply holding it on an old towel.
I mention focal distance because all good engraving is done under a microscope, specifically a binocular engraver's microscope. This is a device that typically magnifies from about 10 power to 30 power. Funny thing is, most knives are shown in a reduction photograph, not an enlargement, and the enlargement is how the knife is engraved. Consequently, engravings at a distance look fantastic, and engraving is rarely, if ever, shown enlarged. The reason for this is because when the photos are enlarged, you can see every cut, every little flaw, every hand-applied imperfection that accompanies all hand-engravings. This is a dirty little secret that engravers like to keep under their hat. The engravings are created under magnification, but not displayed thus, and I'll write more about this in the future.
Engraving bronze is like cutting butter, specifically compared to blade steels and 304 stainless steel, my most often-engraved material. In this particular instance, I didn't want a lot of high detail, more so I'm cleaning up and correcting the casting. I'm also cleaning up the little veins on the leaves of the small sculpture (which is what these castings are) and making just the right fit for the gemstone that will be placed in the pommel. Here is a link to the photo of the completed pommel, and here is a link to the page of the entire piece.

Welding takes place in the metal worker's studio, and it can be as simple as sticking together a rough frame for a piece of equipment, or as complex as using a high purity process to weld together some exotic metals.
The pinnacle of welding technology has always been the GTAW process, or Gas Tungsten Arc Welding, because it allows the largest range of materials to be welded, the finest control, and the cleanest and highest purity welds. In my early days, this was simply called TIG welding (Tungsten Inert Gas) and some old timers like me still call it that.
It works by creating an arc, sustained by a non-consumable tungsten-bearing electrode, running in a shield of inert gas.
The arc is controlled nowadays by a very sophisticated welding machine that simply didn't exist in small scale in the late 1970s when I started. My machine allows a wide variety of shielding gasses, tight control of gas flow and timing, gas focus via gas lensing, and that's just the shielding gas! The machine itself is a marvel, allowing adjustment and control of AC and DC voltage-amperage curves, pulsing, sequencing, waveshape of AC current, high frequency controls, trigger functions, spot control, slope control, waveform balance, percentage polarity within the waveform, waveshape control, and more sophisticated features! It takes a book just to understand the capabilities of this machine, and a textbook to understand the process. What it allows is for me to be able to weld just about every metal you can imagine, and some you may not! I can weld all stainless high alloy tool steels, austenitic and ferritic stainless, copper, bronze, brass, and even nickel silver! This machine can weld silver, gold, and titanium, and even high cobalt, high speed tool steels.
In the photo, I'm doing some very small work, and that is another advantage of this machine. I can weld as small as I can see, and here I'm welding some .060" thick stainless steel with welds only .060" wide. It takes a lot of practice and a very steady hand.

Model making is an the beginning of creating a permanent form. Here, I'm carving a wax block freehand, creating a model that will become a sculpted piece of cast bronze.
I'm using a rotary air-driven motor handpiece for this job. This tool operates from 3000 to 30,000 RPM, and in carving wax, I run it on it's lowest setting for speed.
The reason to have high rotational speeds in all rotating tools is because the work being done is done by surface feet per minute. The smaller a cutting tool is, the less actual surface (the cutting tool's circumference is smaller), so in order to have sufficient surface feet per minute of the tool on the work, a higher rotational speed is necessary. Some of my rotational tools spin at over 250,000 RPM!
This kind of high rotational speed is useless on wax. Wax at high speed rates will simply melt into a blob and splatter as it shoots away from the cutter. What is necessary, as in most tooling operations, is sufficient torque, while the tool is run at a balanced speed, cutting just enough material, but not overheating the tool or the medium being worked. This balance is so delicate that, in metals, strict SFPM rates and feed speeds are recommended and cataloged in printed books and guides. Because such a variety of speeds and materials are used, a wide variety of tools are necessary.
In the photo, you can see the catch tray (old cookie sheet) that collects the wax cuttings, a small plastic drawer of cutters and burrs, various small tools and an alcohol lamp for heating the tools for welding and forming wax.

Here I have a helper stabilize the indicator on a frictionless static wheel balancer. Most people have never seen such a device, and they are indispensable in the machine and fabrication shop. Nowadays, most wheel balancers are dynamic, that is, they use motion and electronic displacement indicators to help balance a wheel in motion. In the old days, this device here did those jobs, and still does.
Simple wheel balancers use a frame and an arbor, and the wheel being balanced rolls back and forth until it stops at a heavy spot, indicating where to remove material to balance the wheel. They are not as accurate as this one, which does not suffer from friction loss. The arbor does not move on the frame, it is static. The frame is balanced to a high degree of accuracy, and the cradle rocks back and forth, moving the indicator to the position that illustrates the balance or imbalance. The tool is a bit intuitive, and incredibly sensitive, perhaps more than most other types of balancers. To give you an idea of how sensitive, if you leave it to rock and stabilize to a rest position, it may take a day or more! So the fingertips help calm it (with the adjustment of the small oscillation-cancelling weight at the top rear of the back of the device, to shorten the time needed for determination and adjustment.
In this photo, I'm balancing a steel disc. After this adjustment, the disc runs so true that I can spin the 9" hunk of steel at 3000 RPM without the slightest jiggle, wobble, vibration, or bounce. Nice!

After a blade is profiled, surface ground, and drilled, the edges are marked. There are various ways to do this, and a machinist set on high accuracy would use his granite plate and a height gauge to figure, set, and mark the edge of the blade. But this would require extensive deburring of the holes and flattening of the blade, and it's just not that necessary. Quicker is the simple tool shown here.
I bought the cheapest steel vernier caliper I could find (no measurement will ever be done with this) and silver-soldered a carbide point to one of the cut-off jaws. I simply adjust the distance to approximately the center of the blade edge, and mark from both sides. This gives the relative location of the center of the cutting edge.
This edge mark will be a guide for all my offhand grinding operations that will follow. This simple set of lines (there are two, but they are so close, you can't really delineate them) are all that is necessary for accurate hollow grinds on the blades. The lines tell me where the grinds will meet, where to remove material, and they follow the edge out to the point. Matching hollow grinds is a critical affair, and something it takes years to learn to do offhand.
Some makers use guides, clamps, bubble jigs, levels, and traps to guide the grinding, but most of these are detrimental to work flow and control. The reason is that the maker surrenders his skill to a jig and guide, and cannot make minor hand adjustments that allow the grind to follow the actual curvature of the edge. he also can not grind a certain area of the blade thin, or leave an area thick if he wishes. More on that illustrated here.
Another issue is that if the maker grinds a wide variety of blades, it does him no good to hobble himself with a jig. The jig, like most tools,
will limit what he does, not expand his grinding ability. When he comes to complex recurves, thicker points, tantos, swage geometries, and complex
duplex grinding, he won't have the simple skill to guide the blade grind, and the jig won't help him.

At the same time I mark the edge center, I also mark the center of the tang at the butt of the knife blade. This will be a guide for tapering the tang. While I taper all tangs differently, depending on their required thickness, the center line is a guide to let me know how balanced the tapering is on both sides of the blade.
A tapered tang is and always will be the sign of a well-made full tang knife. There is no reason to leave a tang at full thickness unless the knife has a skeletonized handle. A full thickness tang adds substantial weight to the handle, and adversely affects the balance of the knife overall. Since the knife will be bolstered (all good full-tang knives are bolstered), leaving full thickness of the tang will also detract visually to the frame profile. This is something not talked about much, but the visual appearance of a thick, blocky-looking tang does not make the knife look strong; it makes the knife look rough and hurried in production. A full thickness tang on a knife with scale handles says to the knife owner that the maker couldn't be bothered with refining the work, and simply wants to do as little as possible to get it out the door. There are no stresses on the handle butt that would require full thickness of high alloy tool steel at this point; even in knives that have persuaders, points, and skull crushers at the butt, the tangs are tapered, but just left a little thicker. Only on extremely large knives with 16" or longer blades does a full thickness tang make sense and look appropriate.

Chemicals are important to most processes, and in knifemaking, they play critical roles in finishing, passivating, etching, plating, or any number of operations. There are chemicals used in anodizing both aluminum and titanium, in creating oxides in steels, and passivating metal parts for the highest corrosion resistance when exposed to salt water or marine environments.
All of these reactive agents fall into one of two types, they are either acid or they are base (alkaline, caustic). This range is established by their pH, as related to clear, distilled or deionized water. Plain clear water has a pH of 7.0, and it's completely neutral in its reactivity potential. Acids have a low pH, and bases (caustics and alkaline) have a higher pH. This is only a generalization for most of these chemicals, as some acids can have a high pH above 14, and some bases can have a low pH below 0! What is necessary to know is the relative reaction potential of each chemical with each other in the vicinity, and that dictates how they are stored.
The critical reason that separate storage is required is because if bases come in contact with acids, the reaction is memorable and destructive. Reaction potential is high, and products of these reactions are created quickly and sometimes violently. We all know what happens when baking soda (a base) is mixed with vinegar (an acid), and I won't elaborate further since there may be children reading this who don't need any ideas! But these chemicals must be stored in separate, non-reactive and vented cabinets made specially for this purpose.
These cabinets are all polyethylene and the are not cheap. It's common for a cabinet of this type to cost more than $1000.00 US. Chemicals, properly stored are essential aids to the various processes, and safety is at the forefront of consideration of all chemistry and processes.

In order to quickly quench knife blades and maintain flatness, in some types of steel and blades, it's necessary to quench them faster than would be possible in still air. This is because blades are thin, and they are often wrapped in stainless foil for exclusion of harmful oxygen during the heat treating process. If one takes the time to remove them from the wrapper, some steels quench too slowly. So knifemakers will often quench with plates of aluminum. They call this plate quenching.
I've taken it several steps further. While most makers use 1" thick or less plates of aluminum to pull out the heat, I use 2" thick blocks in an apparatus that is liquid cooled with chilled water. Aluminum conducts heat extremely fast, and the idea is to carry away the heat into the aluminum, and then into the chilled coolant.
I started the build for the block quencher with an 18" by 18" by 2" thick slab of 6061 aluminum. Here, I'm cutting it in half to make the individual heat exchanger blocks that will be 9" by 18" and will be milled for the coolant passageways. This is the stock that you have already seen in the first "Shop" page series at this link.

Inlay of gemstone in gemstone is rarely done, even by experienced lapidarists. This is because of the unforgiving nature of gemstone. It is very, very hard, and difficult to work with, particularly in the jaspers, agates, quartzes, and jades.
In this project, I was determined to display a checkerboard shield pattern of red and white into a field of black. The red is jasper, the white is milky quartz, and the black is nephrite jade. I started by planning, drawing, and figuring the scale and thickness of the pieces that would make up the checkerboard and field size. I then slabbed the red jasper and white quartz into exact sizes, which involved hand-lapping them. You see, unlike woods and metals, gemstone can only be approximately cut, since rock saws are not highly accurate machines capable of half of a thousandth of an inch of control. There are certain rock saws that can cut this way, but they are for microscopy in petrography and do not typically handle large thicknesses of material.
After lapping the slabs to extremely close tolerances, they are assembled and then cut again, reoriented and assembled using a jeweler's grade epoxy into the checkerboard. Then, they are sliced again to get the two slices I would need for the inlays. The black jade is at the bottom of the photo.

Continuing with the gemstone inlay, you can see in this photo that I've made many extra pieces. This is because you never know with stone if one of them will have an inclusion, or hidden fracture, or not be completely solid.
More than that is the color and pattern. Very little rock is of completely uniform color. In fact, this is one of the things that sets gemstone apart in initial appearance from plastics or manmade materials. There will always be some difference in color, tone, or reflectivity in different areas of the same stone. I wanted to come up with the inlay shields that would be as uniform as possible for this project.
Next, I've roughed out the nephrite jade gemstone handle scales that will take the inlay. This is a black nephrite jade from Australia, and it's as near black as jade can be. In this photo, it looks gray because the roughness of the surface in rock always flattens the final polished color due to light dispersion. This is why you'll always find a spray bottle of water near rough gemstone; by getting it wet, the surface becomes non-scattering, and you can get a better idea of what rock looks like polished.

Now I've cut the inlay pockets. This is a difficult, laborious affair. Rock is not like a piece of wood or metal where you can just drill a hole and file it out. It is a multi step affair that is beyond the scope of this explanation, but suffice to say it takes many hours.
Particularly important is to get the sidewalls of the inlay pockets in the jade square and true and as close as possible to the square edges of the mosaics that will be inlaid. This is what the shields are called (actually pietra dura mosaics), or mosaics of gemstone. This is an ancient and beautiful art, and I'd love the opportunity to do more of it.
The design for this knife is the shield of Croatia, and the knife is the Duhovni Ratnik, the Croatian Warrior, custom made for a great client. He wanted a knife to honor his heritage, and I did my best to do that very thing. Here's the link to the Duhovni Ratnik, finished.

All leather sheaths start as tanned and processed, de-haired leather. In my sheaths, I almost always use 9-10 oz. thick leather shoulder. This is the shoulder of mature cows, and it's thick and strong, and stiff, and it's capable of taking and holding high detail tooling, carving, stamping, and dyes.
When I'm setting up the studio for sheathmaking, I rarely only make one sheath; I work a bunch of them up together. This makes sense from the standpoint of tooling and cleanliness, as the worst offender to unsealed leather is metal dust, a frequent and common part of the knifemaking process. This is because metal dust, especially the very fine dust, will settle on leather, and then as soon as the leather is cased (wetted prior to tooling and carving), the metal will turn into rust, staining the leather! Cleanliness is very important when working with leather.
In this photo, I've laid out a bunch of sheaths: fronts, backs, welts, and belt loops, and will roughly cut them out into manageable sizes before fine cutting them on a high speed, small-toothed bandsaw. The knife I use to cut them is my custom "Toro" I made decades ago in O1, and it's literally roughed out thousands of sheaths! It's important to cut on a supportive but yielding backboard, and this one is fiberglass reinforced acrylic, the same material used to line bathroom shower and tub walls. And no, the fiberglass doesn't dull the hard point of the O1; you can see the cuts beneath. Leather workers will tell you that you never, ever mark leather with ink, but that's only if you're prone to make a lot of mistakes!

The table saw is a versatile, wonderfully simple machine capable of tremendous accuracy, when fitted with the right accessories. The saw I use currently is a rather simple one, a Delta, made in the days when they actually made these saws in the United States and they had some quality. It's a contractor's saw, which means it's pared down to it's lightest, most moveable form, and not a fancy, heavy cabinet saw used in most larger carpentry shops. I have the saw carefully aligned, trued, and fixed, and have outfitted it with the superior Incra® system of fence, which has accuracy of .001" or one thousandth of an inch, rare in any woodworking.
Here, I'm using a tenoning jig to cut a very nice tenon in a piece of red oak. The blade is a stacked dado blade, and it's aligned in a bright yellow zero-clearance table insert, so that there will be no gap in the table for the chips, stock, or travel in feeding the saw.
Wood work requires high accuracy. Nothing in wood is stronger than a properly cut joint, and nothing is weaker than an improperly cut joint. Careful attention to distance, placement, depth, and clearance means interesting setups, like this one where I'm setting the absolute clearance and position of the stock with a hard maple block clamped to the miter gauge for accurate repeatability. I make stands, cases, forms, tooling, and even things that might not be considered part of knifemaking with this critical part of the woodworking shop and studio.

Many years ago, I went to an auction of lapidary equipment and spotted this great find. No one bid on it because they simply had no clue what it was. It has a diamond grinding wheel, several motors and a sump. There were some cabochon shaped metal pieces welded to mounting rods. Most of the other guys at the auction opted for rock saws, a commonly found item in these estate sales.
It turned out to be a cabochon copier, a machine that, when new, could cost about five grand. This one has more wear from age than from use. It's set up to make copy after copy of ground cabs. Though they are roughly ground, they would still have to be finished by hand or by mass-tumbling.
I haven't used it in years, but during that time I've accumulated many dozens of pounds of rock that is just a bit too small for a knife handle, but would be the right size for cabbing. Will I shut down the knife studio and go into lapidary cabbing full time? Not likely, but this machine could be used to work up some artwork that requires many cabs, all exactly the same size and shape.

I figured I'd better include another more recognizable knifemaking photo. While most people only think of the blade, handle, and even less, the sheath, there is simply a lot to knifemaking that goes beyond these three concepts. Grinding a piece of hypereutectoid high alloy powder metal technology stainless steel is certainly a critical hand-skill, but to be really good at knifemaking, grinding, machining, and finishing must become totally natural, so that the knifemaker does it without effort.
This is a part of knifemaking that make so many drop out of the hobby, skill, or trade. Whether knife blades are made from hammered hot metal or from high technology billets, proper grinding is the key to proper finished geometry. I've known of plenty of new makers who simply tire of grinding, getting burned thumbs, abrasion cuts, and hours spent behind a machine that simply rotates an abrasive belt on a wheel. It could be boring, monotonous, and grueling, or it could be exciting, creative, and fun. It all depends on the guy standing in front of the machine.
Here, I'm reducing the tang by cutting out deep scallops to quickly remove some of the meat of the tang before tapering. The tool rest supports the blade, the push stick keeps fingers from being burned.

Again, a big mess, right? Not really. In the middle of knife work, something happened to my small milling machine, and it necessitated removing the milling head. One of the nylon gears finally stripped out, and I was prepared for the replacement with metal gears so that would never happen again.
On the bench, you can see I was right in the middle of knife work, and the blades are simply pushed to the side as more and more hand tools populate the bench. Wrenches, hex drives, cleaners, taps, bolts, shim stock and grease overtake the knife work, for an immediate repair must take place before the knives can be finished. I can see I was working on some counterterrorism knives when this happened, and a client's critical need and order can not wait on a machine repair.
The successful knifemaker, by necessity, has and uses a lot of machines and a lot of tools. This means that, by necessity, he must become a skilled tool repair person as well as a maintenance expert of his tool set. Thankfully, my 15 years as an industrial electrician, mechanic, instrument technician, and maintenance worker gave me a good, solid foundation for this continuous effort, for there is always more than one machine in the studio that needs repair!

The lapidary saw is a simple machine, but has two functions that are wildly different. The first is to spin the blade at a fairly high rate of surface speed, in this case upwards of 5000 surface feet per minute. This saw has an 18" diameter blade, and you can see it resting in the sump at the very top of the photo.
The other extreme of this machine is that the feed speed, the rate at which the rock advances into the blade must be very slow. In this specially built saw, the feed needed to be incredibly slow, as I use it to cut some of my hardest and most tenacious gemstones, mainly jaspers, agates, jades, and rocks with extremely hard inclusions like ruby, nickel magnesite, and magnesium chromate.
In the photo, you can see that the electric motor drives the main saw shaft, onto which is mounted an outboard small pulley driving a larger pulley on a jackshaft below, onto which is mounted a much smaller pulley driving a large pulley that drives the shaft at the top left of the photo. This shaft, in turn drives a worm gear reduction head that is just out of sight at the top center of the photo. The result of all of this speed reduction is that the saw blade is going 100 miles an hour, but the rock is advancing into the machine at one inch in 11 minutes!
 in the studio")
Making HULAs is an involved affair. The HULA is my Holder, Universal, Lamp, Articulating: a moveable, positionable, locking flashlight holder that is simply the very best flashlight holder made in the world today! People may be shocked at my claim, but you will not find any better flashlight accessory anywhere in the world.
To make these is quite a task, and why you won't find them anywhere. After all, when the flashlight costs from $50.00 to $80.00, why make a holder that costs upwards of $300.00 or more to make? Why not just make a dinky plastic injection molded holder or a quickly-stitched nylon sleeve with Velcro?
The HULA is made of welded 304 (18-8) fastener-grade stainless steel, titanium, and welded and formed 5052H32 corrosion resistant, high strength aluminum alloy. The stainless is black oxidized, and the aluminum is anodized and permanently dyed with a 1 mil-thick, near-ceramic hard surface. In this photo, the positioners are made and assembled and the aluminum frames are being fitted together. If you look close, you can see a fully finished HULA in the lower center of the photo and some various and different lamps on the bench that custom HULAs are being made for.
People ask why I make these, and it's because my clients have asked for them. Many years ago, combat rescue professionals and guys that guard archaeological digs asked for a flashlight to be added to the knife-sheath rig. I came up with a permanent, infinitely positionable flashlight holder that bolts to my sheath frames, and can free up the hands in any situation. It's tough, its extremely durable, and it's tremendously useful. While it's worth more than most knife and sheath combinations made by most makers and companies, so is the function and addition in the most critical combat, emergency, and rescue situation.

New equipment in the studio is always an exciting affair, but more exciting is using it to produce more knives. First, the arrival is by truck, and hopefully a lift gate and pallet jack will get it in the big roll-up door. From there, the pallet is dropped off, and it's all in my hands, alone.
Once I clear the wooden top and sides off the pallet, the machine head is unbolted, and inspected, the hoses, wires, and accessories are cleared, and the machine is lifted with a lifting eye. In this case I'm using a simple hand-hoist (in my part of the country we call this a "come-a-long") which is mounted to the 14 foot high I-beam that spans the shop's big room. This particular head only weighs about 700 pounds, but that is enough to demand respect.
The head is lifted and gently lowered onto the machine stand, and the entire affair is lifted onto a rolling cradle that I made when the machine crate arrived. This will allow me to roll this beast around, move it out of my way when I don't need it, clean around it, and organize my workspace.
The machine is a semi-automated surface grinder. The surface grinder simply grinds metal by moving it back and forth; it does not replace hand work or hand-grinding; it just makes metal level and flat and of a certain thickness. Knifemakers can buy metal already surface ground, or they can do it themselves. The surface grinder does not shape the metal in profile; it does not perform blade grinds or hollow grinds, or taper grinds, convex grinds, or even dovetail grinds. It simply makes the surface of stock flat and level which is critical before any hand-operations begin to take place.
At the point of the introduction of this machine into the studio, I now have ten dedicated metal grinders in operation. They are all different, and do different things, but all of them rely upon my pair of hands to control the grinding.
Once a new machine is mounted and functional, it is not ready to use! The manufacturer is not the user, and they often are unaware of issues and problems and limitations of the very machine they make. This one is made (as nearly all are nowadays) in China, but is designed, assembled, warehoused, and shipped out of Wisconsin. The machine had a dysfunctional belt alignment mechanism, a couple broken control panel filter holders, and a cooling fan mounted backwards, blowing debris into the control panel. And this is brand new! Some debugging and tuning is always necessary on new machines. I'm not writing about additional changes and adaptations to my own specific tooling needs; I'm simply writing about making the machine function just as intended! This is why people miss American manufacturing and production, as many of these issues didn't occur in the "old days."

Welding artwork and sculptural components for some of my projects can be challenging. Here, I'm in the process of welding some 304 austenitic high nickel, high chromium stainless steel. The pieces and formed shapes of this triangular component are only .060" or sixty thousandths of an inch thick. By technique and process this means that the welds must be only about sixty thousandths of an inch wide!
This borders on microscopic welding, and I use a serious magnifier in my welding hood to see these tiny welds. A steady pair of hands are critical; it's far too easy to burn a hole right through this thin stainless steel.
The form is being tacked together. A series of small welds keep everything in place when I follow with thorough and complete edge and seam welding. It always takes a bunch of clamps and stock pieces and scrap and jig setups to get it done right. After the piece is completely welded, I'll grind, sand, and finish the work to fit the project.
This particular project is a sculptural component for my "Tribal" artwork at this link.

I've featured this photo before on the website; it's my grinder nest in 2012. In the photo you can see from left to right: a horizontally mounted Bader 2 x 72" belt grinder, a combination modified Hitachi belt and disc angle grinder, an 8.75" disc grinder, a Wilton 2 x 72" belt grinder, the quench bucket, and another Wilton 2 x 72" belt grinder.
There are three more grinders on the other side of the nest that you can't see: a 6" variable speed belt and disc grinder, a 1 x 42" variable speed belt and disc grinder, and a 10" variable speed disc grinder.
Nearly all of the 10 grinders in the shop are variable speed. This is not typical; it often means modifying a grinder/sander with an expensive motor and controller that costs more than the grinder. For instance, a simple 1 x 42" belt grinder sold for wood projects at the big box store can run around $100, but the adaptation to bring it to variable speed metal work can cost over $500. Nearly all machines made for woodwork simply run too fast, not only for metal, but also for hardwoods (like rosewoods and exotic woods) which just burn at the surface-feet-per-minute speeds that work well for pine. Also, frames, discs, and tables that are aluminum are too weak and floppy for machining metal. Even the steel frames of most kit grinders sold today are too floppy and not rigid like cast iron. Cast iron is the best way to frame these machines, and will allow a sturdy and solid foundation for the most accurate hand grinding. Though both of the Wilton grinders are set up with flat platens in this photo, they normally have rounded contact wheels for hollow grinds. The setups change constantly, and you can see on the racks the various wheels, discs, tool rests and accessories that are necessary to get the most out of the grinders.

Time for a cat photo. This is a "tuxedo" cat. His coloring looks as if he's wearing a suit, with a white front and cuffs at his paws and gray everywhere else. He's a rescue cat, trapped with a litter under a trailer in northern New Mexico. His siblings weren't so lucky. It's brutal starting life as an outdoor cat.
He's peeking through a bunch of wrapping. Cats seem to love boxes and wrapping, and can't wait to jump into them. He'll claim the new domain as his own, play a while, and then ignore the whole mess.
I don't believe cats are fully domesticated. Perhaps in another ten thousand years they may actually care about humans, but for now, most cats simply tolerate us. They don't care to please us like dogs do; they're more interested in us pleasing them. And lord knows why we try to, but we do!
They do have critical uses though, and all of them we've had over the years have been good mousers. In an area that actually is driven by the production, storage, distribution, and usage of grain, we have our share of mice. A family of mice in the studio can be utterly destructive, and cats help keep them all at bay.

Abrasives by the roll are a common sight in most machine shops. The 1" and 2" wide abrasive rolls come in all types and grit sizes. The common sizes shown are from 60 grit to 600 grit, and sometimes several widths are needed.
Roll abrasives are one of the more universal types of finishing product used. This is because a section of the roll can just be torn off as needed, and they tear across the roll as well as along its length, because they are built on cloth. It's all about the tear!
You can rip off a tiny square to finish a bit of material, and you can rip a short piece to use in a split mandrel. You can wrap a length of it around a stick to use for sanding, and you can glue some to a stick rod that is just the right shape for finishing a very specific area.
Roll abrasives are used extensively in maintenance. Before the bearings are pressed off a shaft, using a length of abrasive roll like buffing a shoe can clean up the shaft of rust, corrosion, or debris. Cleaning or deburring the inside of a bore is easy with abrasive roll, since it can be wound in a circle that will follow the form and size of the bore. With the right abrasive (usually aluminum oxide and sometimes silicon carbide), the craftsman can finish a variety of materials: wood, manmade plastics and composites, metals, and organics. The only thing they are not effective on is gemstone and hard carbides.

Dispensers are a critical part of any functional machine shop or workspace. This is because there seems to be an endless need of sizes, shapes, and applications of machine tools, and in order for the craftsman and artist to effortlessly move through his creative and working space and projects, he needs to have top-flight organization skills and methods. There is nothing more frustrating than looking for the right tool, the right cutter, the right drill bit and wasting time searching. Maybe it might take a minute, but those minutes add up to hours every month, and years in a career in a disorganized workspace.
You are going to see a lot of organization in my studio and shop. There is no way to work with such a wide variety of materials and techniques and not have an organized way to function, all the way down to the tiniest drill bit (#80 or .0135").
Small drawers are the best way to organize dispensers. They are not the easiest to use, since you have to open a drawer and grab the bit, and some of them are so small you have to grab them with a tweezers! Other methods are a stand, where bits stand upright in a block in an ordered fashion. The drawbacks to the block are that in the dusty environment of the knifemaking studio, all open tool stands will be, eventually, covered in dust. It's much easier to have them clean and in a drawer, unlikely to fall, cut you when you reach over them, or be misplaced.
Another great advantage to drawers is to have them lined with a layer of paper towel. Once a year, I open each drawer and give a shot of rust preventative into the cutter resting on the little square of towel, and this seems to keep rust at bay. On an open stand, the oil would just attract and hold more dust.
The top dispenser is a plastic drawer set for burs. Also spelled burr, these are carbide cutters used to shape metal and softer materials. There are lots of sizes and types: cylindrical, ball, tree, taper, egg, conical, oval, flame, radiused, inverted cone, and pointed. There are different teeth or cutter arrangements: heavy, straight, cross, and finish.
The lower gray drawers are for drill storage. Drills come not only in different sizes, but different size ranges. Fractional drills are most commonly used, and numbered sets and lettered sets fill the wide range of sizes. And then there are metric sizes. All of them, every single one, has a purpose and use. Except the "M" size at .295" which has no use at all. Ahem.

Rotary tools come in all shapes, sizes, and types and they play many critical functions in working with the wide variety of materials the advanced knifemaker uses. While a knifemaker working with steel and wood may get away with a minor amount of tooling, one that works in gemstone, bronze, exotic skins, and sophisticated processes including sculpture needs much, much more to get the job done right.
The small rotary tool may be an air driven, direct motor driven, or flexible shaft motor driven machine, and I believe all three have their necessary applications. The tool that the rotary machine is driving is just as important, and there seems to be an endless need for these tools. The plastic drawer dispenser and the standing rack are the best way to store and access these tools and you might be surprised at how many there are. Not only are they abrasive and cutting, the wide range of grit sizes and abrasive nature of these tools have to be organized and isolated from each other. Nothing is worse than using a 1" diameter soft cotton polishing buff to find out it's been impregnated with a single 220 grit abrasive particle that scratches the metal finish at each rotation. On some of these drivers, that rotation happens at 65,000 RPM, so that means that in one second, over 1000 deep scratches can occur in your nearly pristine finish!
What are these small tools? A huge assortment of arbors, mandrels, and holders, small burs, silicon carbide impregnated rubber abrasives, sanding flapper wheels, small grinding wheels in silicon carbide and aluminum oxide, diamond wheels, drums and finishing points, buffs, hard and soft felt, wire wheels, tungsten carbide abrasive drums, discs and points, leather wheels and points, and six different kinds of polishes are necessary.
At the bottom of the photo, you can see various abrasive compounds, small tool dispensers, and marking, cleaning and rubbing tools. Always present is the container of denatured alcohol which has dozens of critical uses in the studio.
Everything in the photo has splatter on it, and this is because it's on a wet bench. Yes, there is such a thing as a wet bench, where various water dispensers (drip, spray, and bath) aid in the cleaning, cooling, and lubrication of various cutting chores. So the water spray leaves drops everywhere, but that's just cosmetic. I've tried using splash barriers to protect all the tooling, storage, and stations, but they just get in the way and have to be constantly moved or worked around. It's best just to live with the stain of progress...

I make what is probably the very best flashlight holder in the world. Why would a knifemaker make a flashlight holder? Because my clients ask for it, that's why.
Building these holders is quite an affair, and that's clearly why nobody else does them. I start with the center of the adjustment component, the ball joint. Ball joints in mechanical apparatus are very, very old, one of the earliest contrivances, and are clearly based on skeletal structure.
I make these ball joints one at a time, by hand, and they are all made of 304 stainless steel. They have very specific clearances and angles, and there really is no manufactured item that comes close to this assembly. When I work on them, I'll build a group, perhaps a dozen or more, to save time on setups. Here is a small container of a group that have been cut, welded, turned, and threaded and are ready for assembly and dressing.
It was just luck that the little cloud caption on the newspaper was caught in the photo. And they are advertising toilet paper... sigh. The right tools to make just this component of the HULA are: accurate machinist's measuring rules, dividers, scribes, markers, gauges, punches, bandsaw, GTAW welding machine, bench lathe, deburring arbor, mill-drill with tapping head and taps.

High in the shop, above the benches is plenty of unused space. In the future, I'll probably fill up the area, since my ceilings are 14' high. For now, it's easy enough to store lightweight items like saw blades up there, with a tool for grabbing them off the high rack when needed.
This is storage for one of the smaller bandsaws in the studio, in this case a 14" combination unit that uses 80" long blades. Wood cutting blades stored on the left, metal cutting on the right. It's also a good place for portable bandsaw blades.
Just below is the hinged rack for the files. These are larger sized hand files, and they come in many cuts and sizes. The reason that they are hung on racks is because, like knives, files rubbing against files is the worst thing that can happen to them, and that happens when stored in a drawer. This doesn't happen with tiny needle files and micro files, as they have no weight, but with larger files, simply resting in a drawer that is opened and closed will damage them. Also, having them hanging out makes it easier to keep them lightly oiled or dusted with talc to keep them corrosion-free.

This is a photograph of the process of machine-engraving instructional text on a locking sheath back. The sheath is double thickness kydex over an aluminum frame and it's being held in the engraver while a high speed rotary cutter engraves the text permanently into the kydex. The text is: "This side toward frame," which designates the side of the sheath that faces the frame in my modular sheath frame and wear system, detailed on this "Ananke" and on this video.
This is an old engraving machine, and it's surprisingly robust and durable, since I've had it and used it since the early 1990s. It's run from a Windows 486 computer, after all! It's not a complicated machine, and takes considerable manipulation to apply to the various projects. It's made mainly for signage, but does that well.
This is not "engraving" in the typical sense; it's more cutting or dragging to scribe or score the material at the direction of a simple X-Y control in basic CADD design.
The permanent instructions will help my clients locate, position, and use these critical accessories.

In the early 1980s, I bought a 12" bandsaw made by Craftsman. It was a reasonably built small garage-type bandsaw, and they featured an add-on kit that Sears claimed would allow it to be used to cut metal as well as wood.
For those of you who know about these things, you'll realize that very seldom are machines capable of the incredibly high rate of speed required to accurately and properly cut wood (around 3000 feet per minute) and also cut metal (typically around 100 feet per minute for ferrous metals). It takes quite a speed reducer to change from high speed to low, and the one Sears offered had nylon-toothed gears with several toothed belts and a chain, and changing between wood and metal was cumbersome. So after the speed reducer wore out several times, I said to myself, "What I need is a transmission for this saw!"
I eyed the old 1969 90CC Honda Trail Bike that I had since I was a kid, and realized that the eight-speed high and low case transmission on the bike would certainly make the range, and the Honda Trail Saw was born.
Over the years, I swore I would replace it should it ever fail, but it just won't quit! Mainly, I use it for leather and kydex and a bit of wood now, since my metal cutting saws in the studio have vastly improved. But the old thing just won't stop running. Clients who visit the studio always consider it a curiosity, and warmly approve of it since many of them had small trail bikes when they were young.

This is one of my small works benches. You've seen the rotary tool dispenser in a section above. This is a bench that changes constantly, and one of the outstanding items in the photo is the large 6" diameter vent arrangement on the wall leading down to the bench.
This is standard 6" venting, a group of elbows which have the added feature of rotating elements that allow me to set the ventilator wherever I need it, in any position. You can see the 6" to 4" adapter sitting in the background for tighter control when needed. The ventilator is attached to a fractional horsepower squirrel cage blower that exhausts through a large exterior vent cap that prevents backdraft and pulls the air outside at a high rate.
The ventilator is critical when working with solvents, dusts, or polishes and you can see the containers and tools for those on the bench. Vapors and dust accumulate constantly in the knifemaker's shop, and control at the source is the first and best preventative.

The dust collector is a critical part of the grinder nest. Since no one really makes a dust collector specifically for knifemakers, one had to be built in the studio. At the head of the collector is a network of inlet pipes, "Y's" and tees, including high temperature silicone hose and reducers and gates for control of the airflow.
What you see in this photo is the plywood top of a 55 gallon plastic drum, the kind used to store and transport chemicals. The inlet port to the collector fan has tape on it with a note of when it was last cleaned. You can see that I clean it every 3 or 4 years. The decorative duct tape is a nice touch.
The collector is powered by a 1/2 horsepower wood dust collector motor, and I could probably stand to upgrade it to 3/4 horsepower someday, but it does plenty well. At each grinder and station are 6" control gates (blast gates) that confine the airflow to individual stations.
Like many makers, for decades, I simply used a bucket of water underneath the grinder to catch and quench swarf, but the collector works so much better. Cleaning it can be a chore (see next).

Here's the dust collector reservoir ready to empty. This is how much stuff it collects in 3-4 years, and it's a lot. When I first started using it, it was so full that I couldn't move the barrel, and had to move it to the dumpster with a hand truck and empty it with a shovel and a bucket. In our location, the trash all has to be in a plastic bag as well.
The lid is plywood, and the inlet vents are screwed to it and sealed with silicone. If you look carefully, you'll see a wire running between the vent piping. This is part of the grounding circuit. If you think that you don't need grounding when moving high velocity chips and particles, allow me to enlighten you. It's a shocking experience to learn the results of high potential static electricity when moving dry particles, literally. And when getting shocked, it's no fun to cringe and jerk involuntarily while you're holding an expensive piece of metal against a grinding belt. The circuit of grounding helps keep that at a minimum, though doesn't entirely disperse the charge.
The barrel is sealed with foam strip, and the lid held in place with lag screws through the top of the drum lip. the inside looks like it has fine, flammable dust inside it and you might think that this could be a dangerous source of ignition. With sparks from burning metal, high air flow, and fine particulates and in most cases you would be asking for a disaster! However, what you see is leather dust, and I rarely, if ever, use the grinders to grind flammable material like wood. So there is almost no wood in the collector, no paper, no flammable stuff. Leather will not burn, not at all, no matter how finely you divide it. Just try to ignite some leather and you'll see what I mean. There is a reason that welder's jackets and protective gear are made of leather, and firefighter's gloves and many other fire resistant products. It is, after all, skin.
The inlets do not have any deflectors, which differs from shop vacuums and wood dust collectors. This is because the particles enter straight down the larger inlets, and enter a container that has low turbulence because of its size. So as soon as the air enters the barrel, the relative velocity of the stream and particles drop, and they fall to the bottom of the barrel.
Hardly anything comes out of the discharge, which blows to the outside of the building. All the largest particles are collected and this constitutes what I would have to deal with inside the studio if I didn't use the collector, and that's a lot of dust!

The scissors rack is a frequented location. I have many different kinds of scissors and cutters, some reside in sewing and textile room, some reside in the tool chests, some reside in the drawing table that are reserved strictly for paper and nothing else. This rack shows a nice cross-section of cutting and working chores by the blade.
Scissors are very old, originating in ancient Mesopotamia 4000 years ago. Knives are much, much older, and who knows when someone realized that two knives sliding past each other could cut in a controllable, regular fashion.
From left to right: small, tiny, and accurate scissors for exotic skin inlays and fine paper patterns, hemostats and forceps, small flask clamps, towel clamps, sponge clamps, and piercing clamps (borrowed from the medical field). In the middle are textile scissors and scraping knives, and on the right are bulldog metal shears in various sizes. In the lower left are an assembly of bending and forming pliers.
It helps greatly to know how to sharpen every one of these, since they are often abused beyond their original design. For instance, I use scissors to cut 309 and 321 stainless steel foil, which is brutal on a pair of the hardest scissors.

This is a lapidary unit, known in the lapidary field as an "arbor." The arbor has the capability of being mounted with grinding wheels, sanding bands, or polishing apparatus and the process of lapidary finishing requires many setups and changes of these depending on the work involved. Because of the frequent tool changes, you'll always see a wrench nearby.
This particular unit is all stainless steel, which is a great thing. Painted steel lapidary arbors only last about 4 years when the bottoms rust out. The bottoms (sumps) always have standing water with a mixture of grit, rock dust, and compounds, and it makes no sense to clean these units. Apart from scooping up heavy debris in the sump, wiping them down is a fruitless endeavor, since they will be covered in the stain of use at the next job. This is why in functional lapidary shops these units always look dirty. Grinding and sanding rock is a very dirty affair, after all, you are making dirt (ground up rocks) from stone.
I've fitted this unit with adjustable felt water deflectors which keep down the spray and force the water drip (controlled by the needle valves above the arbor) to stay on the particular tool. In this photo, the left arbor has nothing mounted and the right arbor has a 60 grit silicon carbide belt.

Another lapidary arbor, this one with very long arms, typical for the cabochon trade. The arbor is typically mounted with multiple wheels so that a cab maker can move from one end to the other without troublesome tool changes and the extra time involved. In my work, the longer arms allow manipulation of the gemstone handles around the extended arbor length with more clearance.
This unit is painted, and I've already coated the sump and walls with spray tar to help keep corrosion down. It won't last and eventually, I'll be replacing it with a stainless steel unit like the one described above. The arbor is fitted with a 6" expandable drum sander and a diamond belt on the left, and a solid diamond wheel on the right. Yes, there are real diamonds on the belt and wheel, and they cut the very hardest of gemstone.
The big mud flakes in the bottom of the sump are the remains of previous jobs. At the front of the machine you can see a small pipe fitting that allows the sump to drain. The mud collected must not go down a drain, it will clog it quickly. It can be dumped outside, since really, it's just dirt with a few diamond chips!
By the way, I've got six of these arbor units in various setups in the studio, and even some stored just for parts.

Knife blades are ready for layout. Extremely high alloy hypereutectoid martensitic stainless tool steels are purchased in billet form. These are specialty steels, made by modern foundry process, and they can not and should never be subjected to an open furnace or forge fire. There are many reasons for this detailed on my "Heat Treating and Cryogenic Processing of Knife Blade Steels" page. A billet is a six foot long bar, which is typically oversized and rough-surfaced with scale.
Blade blanks have to be cut out, and in my studio, this means dedicated and careful bandsaw work. In order for me to see the scribed line on the steel, I'll spray the billet with red layout dye before scribing. Why red and not blue? The laser on the saw is red, and a red line shows up brightly on a red dyed background, but almost disappears on a blue background.
As an artist, I don't blueprint plans for knives, but use simple templates made from thin aluminum, fiberglass, acrylic, or steel. These templates are my patterns, and I have over 500 of them on my "Patterns" page, the most frequented page on my website. Why does my Patterns page get so much traffic? It's because it's the best knife patterns page on the internet, that's why. Who else offers over 500 knife patterns with links to photos and completed knife project pages? No one. That's why other knifemakers and even foreign competitors are constantly perusing the page, looking for their next idea. Most welcome are my clients: past, current, and future, as they scan the designs and completed knives considering what they might want next.

Flat abrasives sheet comes in all types, and many of them are needed to complete the grinding, sanding and finishing that goes on in the studio. The abrasives particles are silicone carbide, aluminum oxide, and iron oxide. Although garnet is also used, it's relegated to the woodworking area of the studio as it is pretty much useless in metalwork. There are differences in how the abrasive is applied to the sheet, as the coating can be open or closed, and the sheet itself is important: either paper, cloth, or polyethylene.
You can see many different grades of abrasive sheet on the rack. The typical grit sizes are 36, 40, 60, 80, 100, 120, 180, 220, 240, 320, 360, 400, 600, 800, 1000, 1200, and 2000 grit. Finer than the 2000 grit is crocus cloth, an iron oxide backed on cloth.
All of the sheet must be stored flat. You can see some thin plywood panels on top of the sheet to prevent curling. Some of the pre-cut round sheet for my disc grinders and sanders mercilessly curls no matter how you store it. This is because it's pre-coated with adhesive which reacts with the sheet, and the environment. All sheet is labeled with the UAMA grit system and the particle diameter (micron) system for easy identification.

Abrasive belts are the mainstay of the modern knifemaker's studio. Contrary to popular beliefs and un-reality shows, the very best knives are NOT made in a forge. This is the hobbyist side of knifemaking, the POP side, where lots of visual hammering and red sparks interest the uneducated who watch such things. When a professional wants a knife, whether he is in a counterterrorist unit, is a professional guide, or an accomplished chef, he wants the blade to be the very best it can be. Sure, there will always be interest in hammered works, in pattern welded damascus steel blades, and in old-style blade making, but the very best steels are machined and ground, typically offhand, with abrasive and cutting tools. They are also treated in inert gas controlled environment furnaces, and cryogenically processed, with conditions more like a laboratory than a blacksmith's forge. This is because the very best steels can not be worked, forged, hammered, or exposed to the dirty, corrosive, oxygen-laden, low-temperature environment of a forge; simply put, the very best steels can only be machined and ground with abrasives and cutting tools.
This reality distresses a lot of hobby-type knifemakers, who have built their business on 19th century practices, enhanced by electric welders, electric trip hammers, electric hydraulic presses, and electric fan-forced and natural gas or propane forges. They want the public to think that this is how the best knives are made, and this is simply untrue. Ask any machinist; ask any metallurgist, ask any scientist who knows tool steels and you'll quickly find out that there are no hand-forged parts on any serious cutting machine, no hand-forged parts on any aircraft, durable tool, or medical equipment. There are no serious studies on hand-forged steels, parts, or components by AISI, ANSI, ASTM, or any official testing organization, anywhere, because hand-forging is a simple, antiquated craft and not a serious way to produce highly sophisticated functional tools for professionals. This is why I left hand-forging behind many years ago, understanding its limitations to the most basic, simple alloys with low performance expectations. Instead, my clients request high alloy hypereutectoid and stainless tool steels, ultra-modern, ultra-clean high technology tool steels made by sophisticated processes and treated the same way. For more about this take a few hours and study my "Heat Treating and Cryogenic Processing of Knife Blade Steels" page.

Once one understands that the very best blades are machined and ground (abraded) it becomes clear that the abrasives are a critical part of this process, and modern abrasives are highly sophisticated. Just take a look at information by the AES (Abrasives Engineering Society) and the UAMA (Unified Abrasives Manufacturing Association). To accurately and efficiently abrade and grind these sophisticated metals and other non-metal materials, the belt grinder must be outfitted with a wide variety of abrasives. The rack in the photo above is the working rack, simply the current belt set in use in the current job. To the right is a photo of the belt storage rack, with dozens of different types and grits. It's not uncommon to have hundreds of belts in the studio, both racked and boxed, and each one must be categorized, stored, and identified for its unique use and properties.
Belts can be backed with cloth, paper, or polyester. The abrasives can be silicon carbide, aluminum oxide, diamond or impregnated cork, and can be structured onto the belt, open coat, closed coat, graded, temperature rated, lubricated, or dry. A book could be written on just the modern abrasives technology in the studio, and it's great to be alive during a time where such sophisticated technology exists for use with some of the highest technology metals to ever exist. Why would a knife owner want anything less?

Making modular sheath accessories can be a very labor intensive process, particularly when each one is an individual prototype, and no process, instructions, or guide to building these specialized accessories exists. A knifemaker/artist may do this continually: inventing, creating, making, assembling, and testing these components. This is not something factories do; they are not really interested in how an individual may need a knife/sheath combination to function. This is up to the individual knifemaker; he leads the field in inventive new technologies, or should, if he is to be successful.
The photo is my main bench during the building process. You can see tape measures, both metal and cloth, webbing, shears, screw holders, parallel pliers, neoprene sleeves, magnifiers, blackened stainless steel frames, rules and hardware. In the very back, you can see rolled neoprene and ventilated web mesh rolls, with a roll of 2" black polyester webbing.
This all works in my modular sheath accessory system, detailed and described on my page about my Ananke khukri.

There are a lot of small pieces: hardware, components, parts, and fasteners that go into very well-made tactical and artistic knife sheaths. This hardware is made of various materials: brass, nickel, steel, stainless steel, nylon, and titanium, and many of these parts can not be purchased but must be hand-made. For standard fasteners, Chicago screws, snaps, rivets, eyelets, and straps, many suppliers must be contacted, and it helps to keep a detailed reference library in the office to maintain these critical small parts on hand. Nothing is worse than running out of a specialized fastener, and having to order it, sometimes from a foreign country, as some small parts are simply not made in the United States.
While small plastic drawer containers and dispensers are fine for really small hardware, what you see here is simply too large. There are no easy storage containers that allow a quick visual inspection of the volume and presence of this type of hardware, so I created a simple PVC screw top jar rack to store these supplies. At a glance you can locate the component, and see when you are about to run out of it. Labeling all the jars helps with the organization, and labels are easier to read than my handwriting!
Many of the components stored are individually made. For instance, if my tooling is set up to make stainless steel clamping bars for my belt loop extenders, I'll make over twice what I need, and then I'll be ahead of the game on the next batch. The same goes for locking sheath mechanisms, retainer plates, spring pins, and horizontal and vertical strap clamps. I usually don't anodize these components until I'm actually completing the sheaths, since clients wishes and needs vary on the color. Coyote brown and black are the most common requests.
Also stored in the containers are individual bags of variants of the fastener. For instance if I have some stainless steel Chicago screws that are slotted, blasted, and coyote finished, they are kept separate. You can also make out the plastic patterns of some of the components in the containers that aid in layout and machining of these items.
At the top of the photo, you can see a rack of spray bottles. These populate the studio in various locations. Window and glass cleaner is a common necessity, and so is alkaline cleaner, neutralizers for both acids and caustics, ammonia, soap, and plain water.

In this photo, I'm transferring liquid nitrogen from a thick Styrofoam box into a Dewar bottle. I do not use Styrofoam in the processing of the steel blades in any way; I was performing a post-treatment weight measure. The liquid nitrogen is poured from the actual aging container (not shown) into the Styrofoam which is placed on a scale to measure the weight, to determine how much was lost or used during the process. Weight is how liquid nitrogen is purchased, measured, and used, not by volume, but it's critical to know how much volume a pound of liquid nitrogen occupies. By the way, the liquid nitrogen is -325°F (-200°C).
Many knifemakers actually cryogenically age their knives in the Dewar container, and this has severe limitations. The first is that the knives can only be fit inside the neck of the container, which is usually about 2" in diameter. The second limitation is much more important: knives should never, ever be brought suddenly into the vicinity of the super-cold cryogenic liquid, as there is a very specific rate of cooling that must take place, 4-5°F per minute! Makers who shove knives into Dewars do not understand the physics of the process; this is why there are dedicated cryogenic processors to control this cool-down rate! I use the 30 liter Dewar container simply for short term storage of liquid nitrogen. The Dewar unit is stored in a large shallow cryogenic freezer that is -125°F to extend its usefulness and retard the boiling evaporation that can quickly use up the nitrogen in typical ambient room temperature. The shallow cryogenic freezer also contains my processing apparatus.
Tapering knife tangs starts after the weight relieving holes are drilled. The tang is held against a 60 grit ceramic abrasive belt, riding on an aggressive high-durometer serrated contact wheel, at a very high speed.
This action hogs out the center of a scallop that runs the length of the tang. It's an aggressive measure meant to relieve most of the bulk of the tang prior to accurate tapering. It's also a way to screw up a tang and a knife blade in a hurry! One mistake, one overcut, and the pattern is ruined. The grind is done exactly down the center line of the tang, and with a curved profile, this is sometimes hard to determine. Also, the scallop does not extend to the butt, and does not cut into the edges of the profile.
I'm using a push stick to apply pressure, since the steel gets very hot. the tool rest supports the work, and the hands are protected by gloves from the high temperature swarf. You don't see a lot of sparks in this photo, or any other photo of grinding high alloy hypereutectoid stainless steels, because they don't spark and oxidize like lesser steels, but they do throw plenty of burning swarf.

After the scalloped cut of the center of the tang, the tang is roughly tapered on the flat platen. This takes quite a bit of control and practice, and there is no way to learn this but to make a lot of knives, and taper a lot of tangs.
Only the sharpest belts will do, and I find gloves cumbersome and they reduce the sensitivity needed to do this. The tang is held and supported with a heavy magnet in this photo, but I've also used push sticks and metal rods that engage in the holes in the tang. The angle for the tang taper is determined here, and that is judged by the gap where the blade meets the belt. It's difficult to explain and the side-to-side angle must be carefully controlled, or the taper will not be flat but angled and impossible to correct. The belt is running at a very high speed, and like all off-hand metal grinding, can quickly ruin a blade. Add to this that I've already removed by drilling a large portion of the metal in the tang, followed that up with a deep scalloped cut from each side, and the tang can be overcut quickly.
In a previous section above (Edge marking), I detailed marking the center of the tang at the butt, and that mark is what I use to make sure my tapers are centered.

After the scalloped cut, and the main bulk of flattening that occurs at the flat platen, I true up the flatness of the tapered tang with the disc grinder. This is a coarse abrasive, at very high rotation, and it's capable of delivering the nastiest abrasive road rash burn you can imagine, if you slip just one little bit. You can see how close my knuckles and fingers are to the aggressive high speed disc, so careful attention is critical here.
Add to this that the abrasive is rotary, and applies a rotational force to the blade tang, pulling away in a circle, trying to twist the blade out of the hand. This is why very strong hands are necessary in offhand machining of knife blades, and I've known a lot of guys who just don't have the grip to secure a blade, particularly the very large blades (with large surface area contact) and the small blades (which offer very little gripping area).
In the photo you can see how thin the very butt of the knife tang is. This is a very good taper, a sign of a well-made knife, and it's nearly all done on the flat platen. The disc merely trues up and accurately flattens what has been roughed in on the platen.

What does a knifemaker do for fun? Why make more things and different things, that's what. I thought I'd wrap up this second shop/studio page with a few photos and description of something unique.
This is the frame for a what will become a cedar chest that I made years ago for my oldest granddaughter on her graduation from high school.
The frame is red oak, and I used a dowel assembly for the frame parts. I wanted to use as little metal as possible for the assembly, and I built this chest entirely offhand, on the fly, without any type of plan. That's what makes it fun.
You can see the three drawers in the background, and the frame members clamped and glued with c-clamps and pony clamps.

Here's the chest after lining it inside and outside with American Red Cedar. Red cedar is used because it has high resistance to insects and natural oils and repellants that make it smell wonderful. I used porcelain and steel handles and made turned heavy feet. This was a fun project and completely unique.

Here's the interior of the cedar chest. I made a special lock mechanism with a hidden release, and there are heavy metal pins securing the drawers when the lid is closed.
It was a neat thing and fun thing to do for my granddaughter, something that she can treasure and perhaps pass down to her family one day.
Thanks for taking the time to be here, and learning just a bit about my studio, shop, and workspace. Thanks most to my clients who have requested this page, and honored me with the support that allows me to do what I love!

| Main | Purchase | Tactical | Specific Types | Technical | More |
| Home Page | Where's My Knife, Jay? | Current Tactical Knives for Sale | The Awe of the Blade | Knife Patterns | My Photography |
| Website Overview | Current Knives for Sale | Tactical, Combat Knife Portal | Museum Pieces | Knife Pattern Alphabetic List | Photographic Services |
| My Mission | Current Tactical Knives for Sale | All Tactical, Combat Knives | Investment, Collector's Knives | Copyright and Knives | Photographic Images |
| The Finest Knives and You | Current Chef's Knives for Sale | Counterterrorism Knives | Daggers | Knife Anatomy | |
| Featured Knives: Page One | Pre-Order Knives in Progress | Professional, Military Commemoratives | Swords | Custom Knives | |
| Featured Knives: Page Two | USAF Pararescue Knives | Folding Knives | Modern Knifemaking Technology | My Writing | |
| Featured Knives: Page Three | My Knife Prices | USAF Pararescue "PJ- Light" | Chef's Knives | Factory vs. Handmade Knives | First Novel |
| Featured Knives: Older/Early | How To Order | Khukris: Combat, Survival, Art | Food Safety, Kitchen, Chef's Knives | Six Distinctions of Fine Knives | Second Novel |
| Email Jay Fisher | Purchase Finished Knives | Serrations | Hunting Knives | Knife Styles | Knife Book |
| Contact, Locate Jay Fisher | Order Custom Knives | Grip Styles, Hand Sizing | Working Knives | Jay's Internet Stats | |
| FAQs | Knife Sales Policy | Concealed Carry and Knives | Khukris | The 3000th Term | Videos |
| Current, Recent Works, Events | Bank Transfers | Military Knife Care | Skeletonized Knives | Best Knife Information and Learning About Knives | |
| Client's News and Info | Custom Knife Design Fee | The Best Combat Locking Sheath | Serrations | Cities of the Knife | Links |
| Who Is Jay Fisher? | Delivery Times | Knife Sheaths | Knife Maker's Marks | ||
| Testimonials, Letters and Emails | My Shipping Method | Knife Stands and Cases | How to Care for Custom Knives | Site Table of Contents | |
| Top 22 Reasons to Buy | Business of Knifemaking | Tactical Knife Sheath Accessories | Handles, Bolsters, Guards | Knife Making Instruction | |
| My Knifemaking History | Professional Knife Consultant | Loops, Plates, Straps | Knife Handles: Gemstone | Larger Monitors and Knife Photos | |
| What I Do And Don't Do | Belt Loop Extenders-UBLX, EXBLX | Gemstone Alphabetic List | New Materials | ||
| CD ROM Archive | Independent Lamp Accessory-LIMA | Knife Handles: Woods | Knife Shop/Studio, Page 1 | ||
| Publications, Publicity | Universal Main Lamp Holder-HULA | Knife Handles: Horn, Bone, Ivory | Knife Shop/Studio, Page 2 | ||
| My Curriculum Vitae | Sternum Harness | Knife Handles: Manmade Materials | |||
| Funny Letters and Emails, Pg. 1 | Blades and Steels | Sharpeners, Lanyards | Knife Embellishment | ||
| Funny Letters and Emails, Pg. 2 | Blades | Bags, Cases, Duffles, Gear | |||
| Funny Letters and Emails, Pg. 3 | Knife Blade Testing | Modular Sheath Systems | |||
| Funny Letters and Emails, Pg. 4 | 440C: A Love/Hate Affair | PSD Principle Security Detail Sheaths | |||
| Funny Letters and Emails, Pg. 5 | ATS-34: Chrome/Moly Tough | ||||
| Funny Letters and Emails, Pg. 6 | D2: Wear Resistance King | ||||
| Funny Letters and Emails, Pg. 7 | O1: Oil Hardened Blued Beauty | ||||
| The Curious Case of the "Sandia" |
Elasticity, Stiffness, Stress, and Strain in Knife Blades |
||||
| The Sword, the Veil, the Legend |
Heat Treating and Cryogenic Processing of Knife Blade Steels |
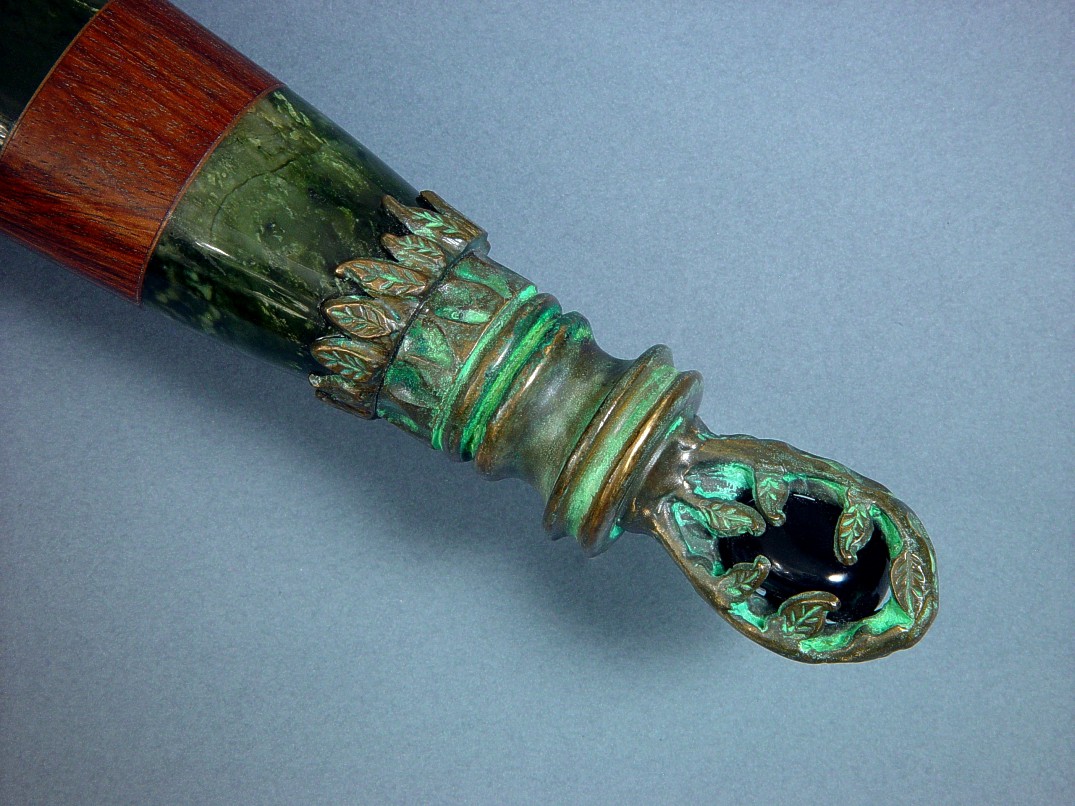